


Have you ever organized a business event and found yourself grappling with the challenges of ticket security?
You know the importance of creating a seamless experience for your attendees, but how can you ensure that the entry process is secure and free from any ticketing mishaps?
From dealing with counterfeit tickets to unauthorized reselling, the risks associated with traditional ticketing systems can be detrimental to the success of your event.
One of the most effective ways to do this is by generating secure tickets that are difficult to duplicate or counterfeit.
In this article, we will discuss the importance of secure tickets and provide you with some tips on how to generate them for your business event.
A. Why do you need secure tickets?
Secure tickets are important because they help you:
1. Prevent counterfeit tickets
Counterfeit tickets can lead to a multitude of problems for your business event. They can lead to overcrowding and the inability of the venue to accommodate all of the attendees, which will result in a loss of valuable revenue.
However, by generating secure tickets, you can reduce the risk of counterfeit tickets being sold or used, so that only genuine attendees are granted access to your event.
2. Easily track attendees
If you produce secure tickets with barcodes and QR Codes printed on them, you can easily track the attendance at your business event. This is particularly useful if people will be charged an entry fee or sell their tickets at the door.
3. Improve attendee experience
With easily scannable tickets, your attendees can quickly enter the event without delays or inconveniences.
B. How Ticket Generator can help?
Ticket Generator is a powerful ticketing software that will help you create and print secure tickets for your business event. It's easy to use, with no programming or design skills required. You can customize the ticket design with your own logo, text and images, or choose from over pre-made templates.
Here are the features of Ticket Generator that you can use to create your own tickets;
1. Ticket validation
With QR Code-based tickets, you can easily validate the ticket details. When the attendee enters the event venue with his or her ticket, all you need to do is scan the QR Code to validate it. This way, you don't have to manually check the name and other details of each attendee.
To do it, you just need to install the ticket validator app, scan the QR Code on the ticket, and grant the entry.
This whole process doesn't even take more than two seconds. And here's what you'd see on performing a scan:
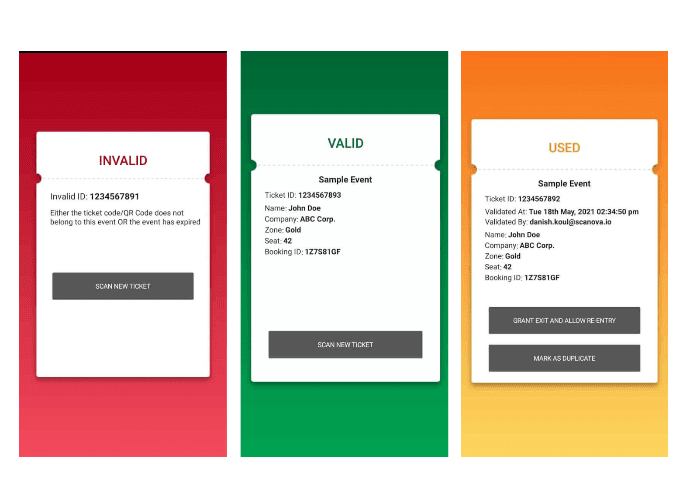
This doesn't leave any room for duplicate or unauthorized entries to your event.
Furthermore, to ensure your guests' safety, all three mentioned processes are contactless.
You can watch this video to know more about it:
2. Bulk generation of unique tickets
You can generate as many QR Code-based tickets as you may need. And since each ticket comes with a unique QR Code, it can't be forged.
When scanned by authorized personnel, the QR Code reveals if it's a valid, invalid, or duplicate entry.
Thus, you don't need to worry about any unauthorized entries to the event.
3. Ticket distribution
Ticket Generator comes with multiple options for distributing the tickets. You can use our web app to generate QR Code-based tickets, and then distribute them in any way you want by emailing them to your guests or printing them out on paper.
All that your attendees need to do is show the ticket at the entry gate, get it validated, and enter the venue. It's that simple.
4. Event analytics
These tickets also offer analytical data for the event.
With this data, you gain valuable insights into your event and guests. It could be event attendance, the total number of new, used, expired, invalid, duplicate tickets, tickets validated per coordinator, and the total number of re-entries allowed.
This data can help you optimize your future events better.
5. Event Registration
Would you want to get people to register for your event? Many event organizers do want that. Then you must look for a tool that helps you get the registrations while also providing the rest of the features that we discussed.
Here, you get to create a mobile landing page for the guests. When they open the link to go to this page, they can register themselves for the event.
Next, you can approve the registration or even choose to get the registrations approved automatically. As registration is approved, a ticket gets generated automatically and is mailed to the required guest.
You can learn more about the Ticket Registration feature here.
C. How to create business event tickets?
To create business event tickets, you need a professional ticket generator service such as Ticket Generator. Here's how it works:
1. Generate tickets for your guests
a. Go to Ticket Generator and sign up to create an account
Don't worry. Your credit card details won't be needed. And after signing up, you'll also get the first ten credits for free. Each of these will help you make a ticket
b. Now, click on Create New Event option.
c. Add event-related information such as event name, date, description, venue, and time. Once you're done, click on Create.

Once you've entered all the details, click Create.
Design tickets
d. After creating the event, you'll be asked to design the tickets. Here, you can either go with the Upload Own Design option or select a pre-designed template from a number of templates. Ticket Generator offers option to design the tickets from scratch as well.
Upload Own Design: This option allows you to design your ticket using your own ready-made design template.
With this option, you can superimpose the QR Code and unique ID on the ticket.
Moreover, it also allows you to add variable information (which would be different for each ticket) by clicking on the + button. It could be the guest's name, row number, seat number, etc.
Here's an example of a ticket created using a readymade template:

Edit Design: Here, you can use the Ticket Generator's standard design to create tickets from the scratch. It gives you the option to add a logo, change the background color, or add a background image to your ticket.
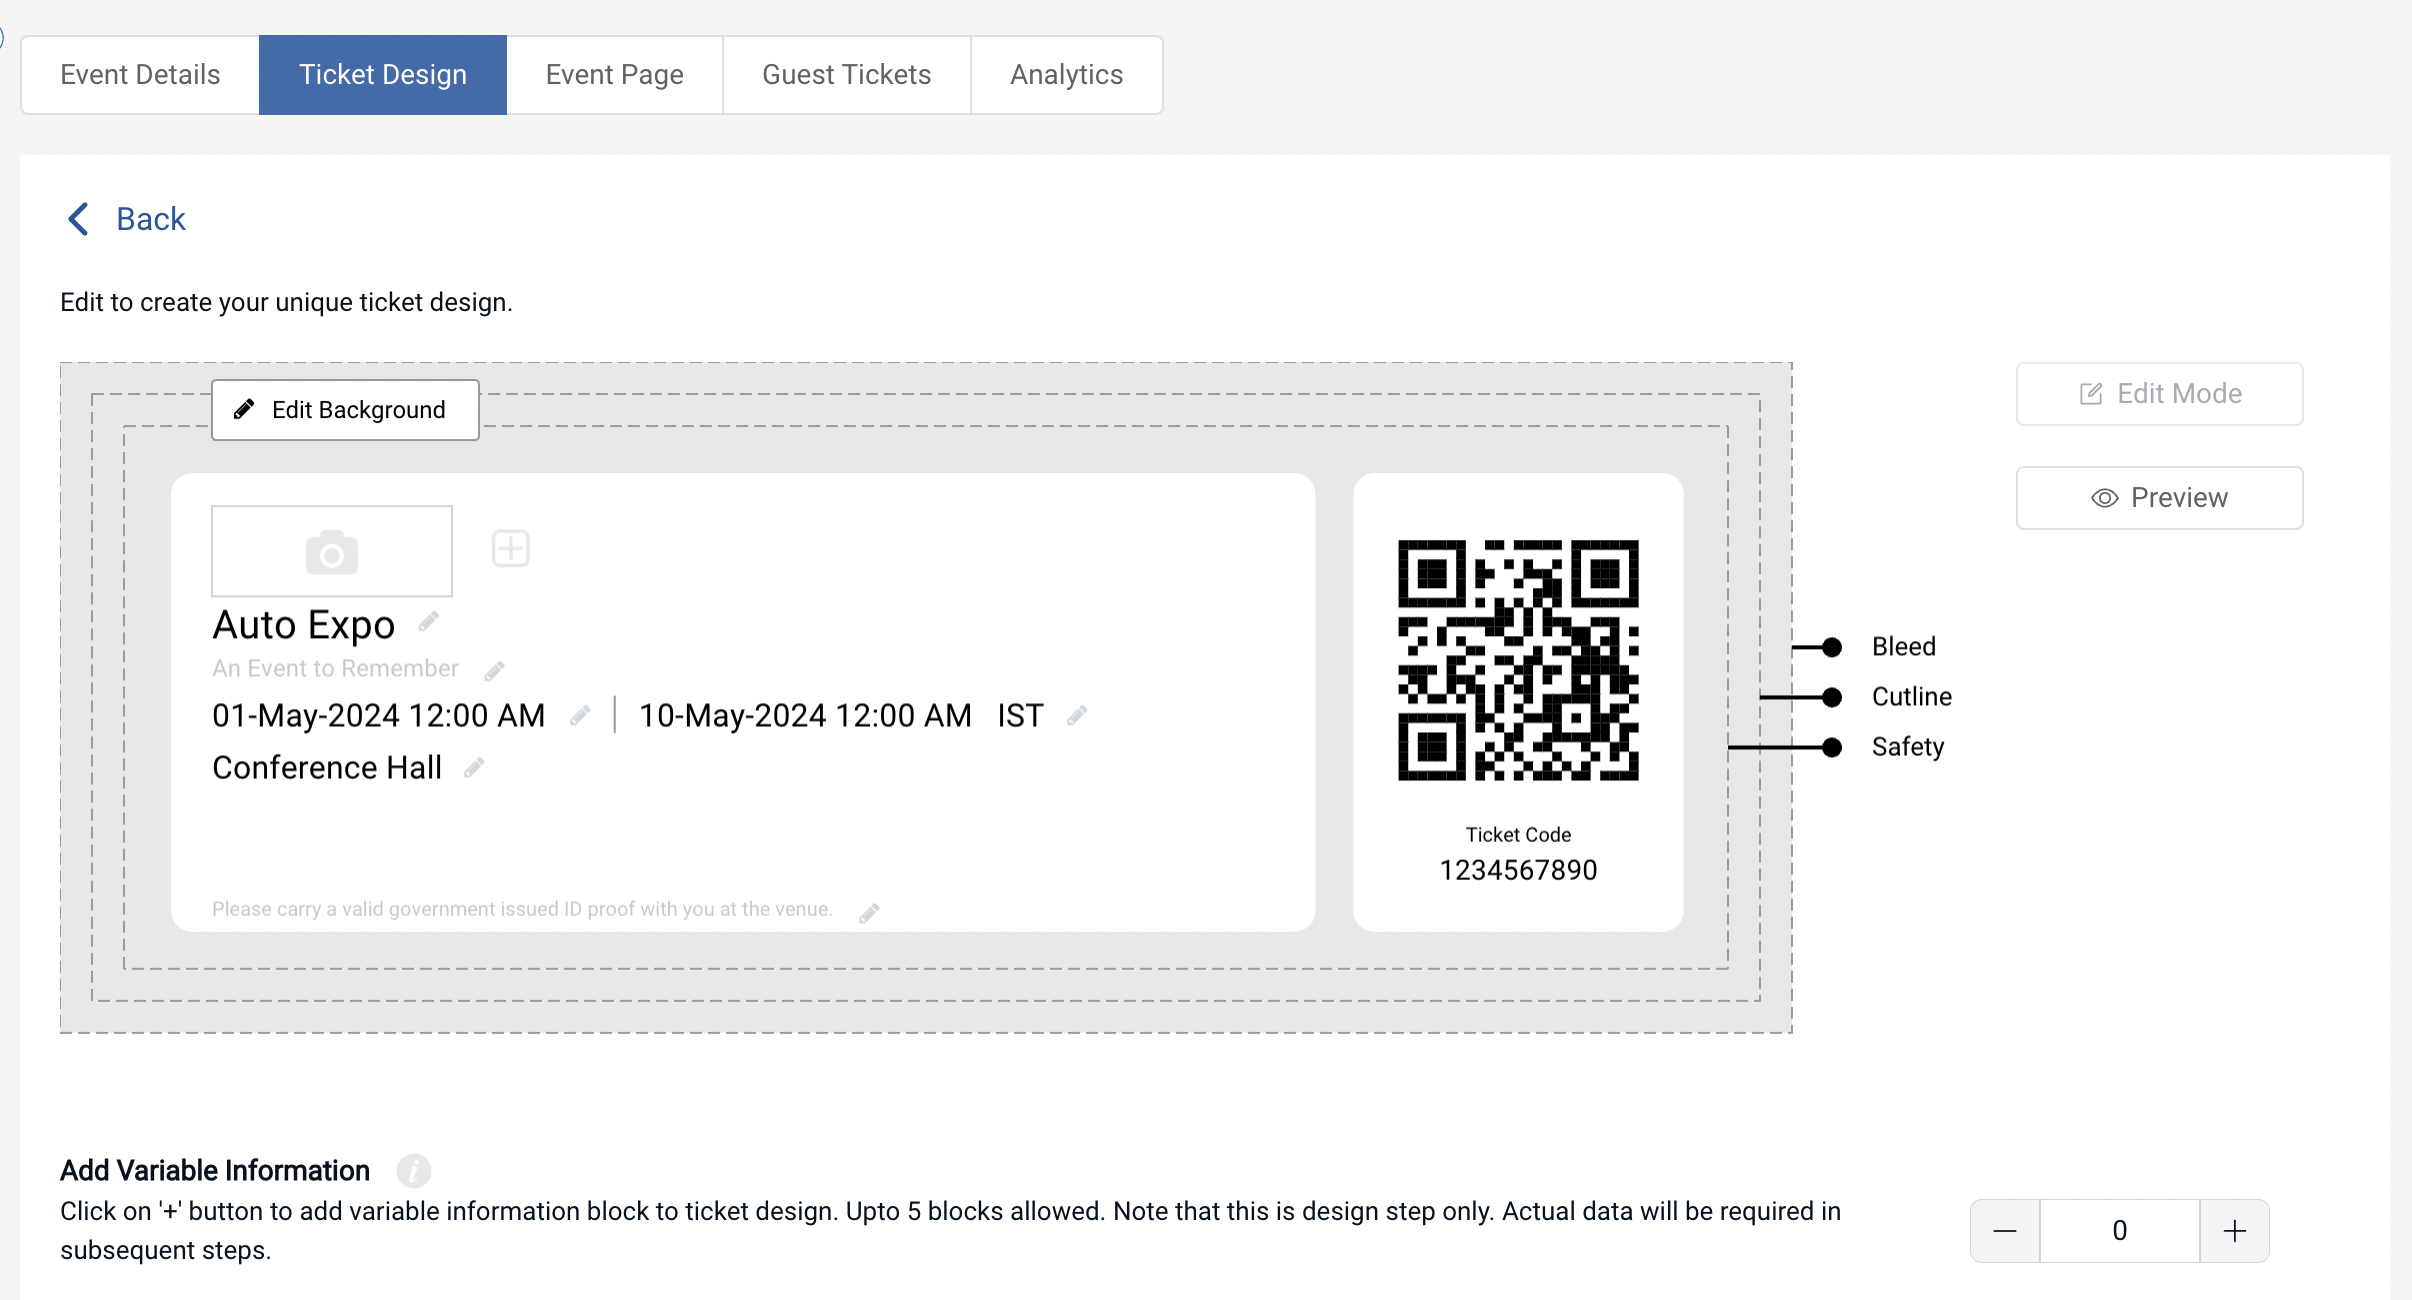
Once you've designed your tickets, click on Preview to see how your ticket design looks.
Choose from templates: If you don't want to design the entire ticket but you still want to give it a fancy look, this option is right for you. Simply click on Choose from templates option to access this feature.
Once clicked, you will see a number of pre designed templates to choose from. To select a template click on Select Template button right below the chosen template and that's it, your ticket, with all the information, will turn into a designer ticket.
Delivery method
d. Now that you've finalized the design, click on Done. You'll be asked to specify the Delivery method. Here, you can choose how to distribute your tickets to the guests. You'll see the following three options to choose from:
i. Generate Form Link: This option allows you to design and share your very own event registration page. This includes adding images, event description, details, specifying the form fields, and customizing the button text
ii. Generate and Download: Here, you can generate and download the tickets in a printable format (PDF).
iii. Generate and Send: Here, you will further need to choose from the following three options:
a. Send tickets by email only: It allows you to email the tickets to the guests. Here you can specify up to 1,000 emails. You can add the emails in a CSV, XLS, or XLSX file and upload them. Or you can even manually type the emails in the given fields
b. Send tickets by SMS only: Here, you can send tickets to your guests via SMS. You can specify up to 1,000 phone numbers
c. Send tickets by both email and SMS: In this option, you can send tickets both by SMS and email to your guests
iv. Generate via API: In this option, you can integrate ticket generation into your own information system. This will allow you to generate tickets programmatically in real-time. For more information, you can refer to this detailed guide on Ticket Generator API
e. Once you specify all the details, click on Generate. All the tickets will be generated and you'll be notified via email
That's it. That is how you can generate business event tickets in bulk.
2. Generate single tickets for contingencies
Ticket Generator also allows you to generate and distribute single business event tickets to the guests. It is useful in two ways:
a. Having unplanned guests at the last moment
Say you are organizing a business event and have created the tickets for all the attendees. But at the last moment, some unplanned guests have walked down on your dance show. And they want tickets for it.
Now rather than generating a whole batch of tickets again, you can simply create additional tickets quickly. Here's how:
i. Login to Ticket Generator
ii. From the dashboard, click on the event for which you want to create these tickets.
iii. Now, click on Guest Tickets tab.
iv. Here, click on New Ticket(s) drop-down and select the Single Ticket option select the delivery method Download Ticket and Send Ticket as per your choice.

Download Ticket: This option allows you to generate and download the ticket.
Send Ticket: This option helps you send the ticket to the guest via email ID or phone number.
vi. Once selected, click Generate & Download (in case of Download Ticket) or click Generate & Send (in case of Send Ticket)
That's it. A new single ticket will be generated.
b. Resending the tickets
Say you had sent the tickets to your guests via email or phone. But somehow, some of them didn't receive the tickets. Here again, Ticket Generator can help resend the event tickets to guests. Here's how:
i. Login to Ticket Generator
ii. From the dashboard, click on the event for which you want to resend the tickets.
iii. Now, click on Guest Tickets tab.
iv. Click on Resend Ticket.

v. Now, you'll have to specify your preferred mode of searching for the guest's ticket. You can use the ticket ID to do it. Alternatively, you can also use the guest's email address or phone number which you entered while creating the tickets
vi. Once you've entered these details, click Search. Now, you will see the ticket details
vii. Click on View and you'll be asked to specify the guest's email ID or phone number. After submitting these details, click Resend
Note that you'll not be charged extra for resending the tickets.
Now, let's move ahead to detail how you can validate these tickets.
How to validate tickets?
Event organizers can validate the ticket to know if it's a valid, duplicate, or invalid entry.
To do it, you'll first have to add coordinators for the event within the Ticket Generator. Once you do it, they'll get authorized to validate the tickets. Here's how to do it:
1. Go to the Manage Event section from the dashboard.

2. Select the required event and click on three horizontal dots under the More option
3. Now click on Add/Edit Coordinator
Here, you can specify the email address of each coordinator. The coordinators will then receive an email invitation using which will have to log in to the Ticket Validator app on their phones
4. Next, they can install the app on their smartphones via Google Play Store or App Store and log in
5. Now they can open the app to select the event they need to validate tickets for. They can then click on Scan QR Code and get started with validating the tickets
Event analytics
Here's how you can view your analytics with the Ticket Generator:
1. From the Ticket Generator dashboard, go to Manage Events.
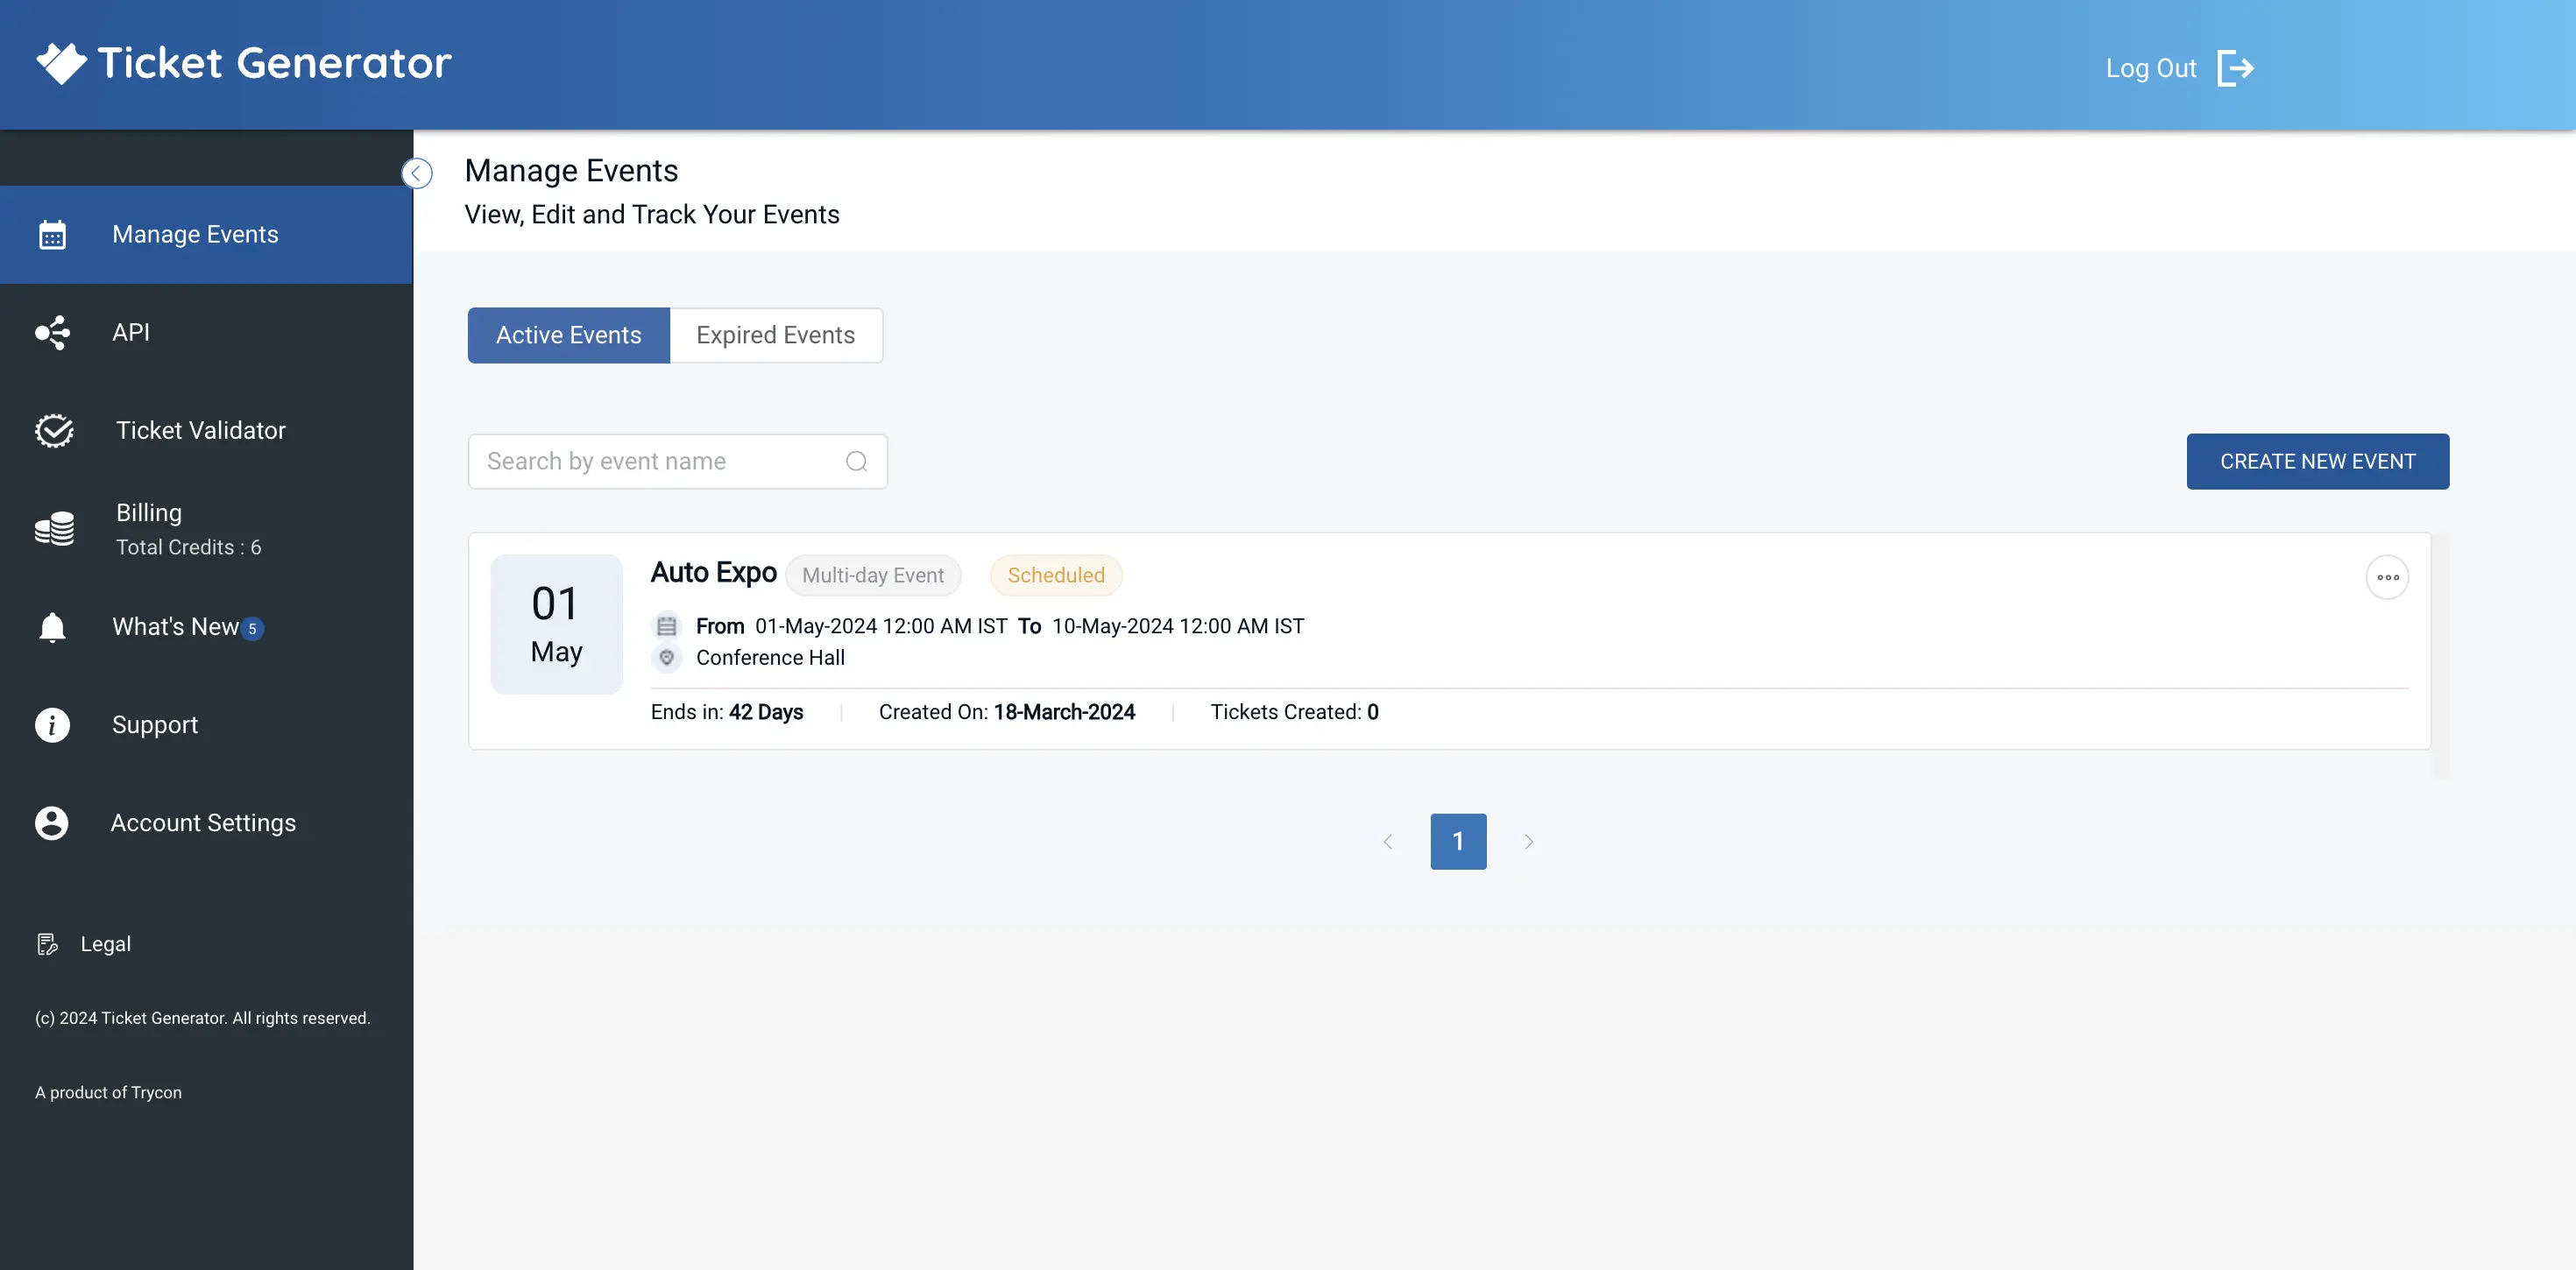
2. On the page that loads, click on the event you want to track the attendance data for.
3. Next, click on Analytics section
4. On the landing page, you will see attendance percentage, event status, and when the event ends. Moreover, you also get all the data on event attendance such as:
- Attendance by time period
- Tickets validated per coordinator
- Used, new, expired, and invalid tickets
- Duplicate and re-entry allowed counts
You can download the entire analytics in PDF or XLSX format. Alternatively, you can also see the Download CSV icon alongside each of these sections. You can click it to download the specific analytical data for whichever section you want.
That's it. That is all you need to know about business event tickets. From creating the tickets and distributing them to validating entries and monitoring analytics, it's an easy and effective method.
Next steps
Now that you know how to create, distribute, and validate event tickets, it's time for you to put what you've learned into practice. Start by creating an account with Ticket Generator.
You can use this tool to help manage the entire ticketing process from start to finish. Start customizing your secured tickets now, your first 10 tickets are on us!


.gif)


.webp)

