Are you a business looking for a more efficient and secure way to manage event ticketing?
Worried about the hassle of physical tickets, the potential for loss or damage, and the inconvenience to your customers? Look no further, as digital ticketing is here to address your concerns.
In today's digital age, more and more events are offering a digital version of their tickets, and for good reason.
Digital ticketing offers a whole host of benefits to both you and your customers. From managing the ticket generation to allowing easy entry to the event, digital ticketing is a valuable tool in your arsenal.
If you’re considering offering ticket PDFs, you are at the right place. In this blog, you will learn how to download PDF tickets and share them with your customers.
Let's dive in.
Why PDF Tickets?
Before we dive into the step-by-step guide, let's understand why PDF tickets are the preferred choice for many event organizers and attendees.
PDF tickets offer several advantages over traditional paper tickets:
1. Convenience
PDF tickets can be accessed from any device, including smartphones and tablets. With mobile tickets, attendees no longer have to carry physical tickets or worry about losing them in the event of theft or damage.
2. Security
Digital tickets cannot be lost or stolen, so there's no risk of a ticket being used by someone other than the person who purchased it. You can also set up security measures to prevent unauthorized access to your event by creating a unique QR code for each ticket.
This can be used to verify the identity of each attendee at the door and to ensure that only those who have purchased a ticket are allowed entry. Another advantage is that, a customer can not use the same ticket multiple times, which prevents fraudulent activities. This ensures a secure and fair entry process for all attendees.
3. Automation
Digital tickets can be sent to your customers in real-time, so there's no need for you to spend time printing hard copies yourself or relying on a third party for delivery.
You can also automate ticket distribution by integrating with a ticketing maker tool like Ticket Generator, allowing you to send digital tickets directly from your registration page.
The Step-by-Step Guide to Download PDF Tickets
Here's the step-by-step guide to downloading your PDF tickets:
1. Design your ticket from Ticket Generator
With Ticket Generator, you can easily customize the appearance of your tickets to match your event branding. You have two different options to generate your ticket:
- Use your pre-made design
- Customize and design the ticket from scratch
- Select from templates
A. Use your pre-made design
- Choose the option to upload your own design template.
- Make sure your design template is in PNG, JPEG, or JPG format and does not exceed 5MB in size.
- Once uploaded, you can place a QR Code and ticket ID anywhere on the ticket. These elements are movable and resizable.
- If you have variable information to add, such as unique details on each ticket, click on the "+" sign to add variable information blocks. You can customize the text color and resize the text to your preference.
- You can also edit the Header and Value text to see how the data will look once ticket information is uploaded and tickets are generated. Note that the actual data of the Header and Value will be taken care of in subsequent steps.
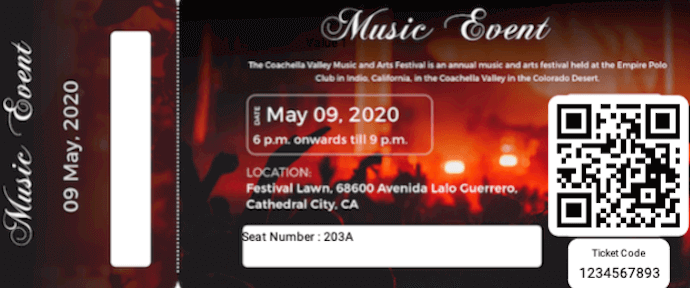
- If you're satisfied with the design, click on Preview to see your ticket layout with the QR Code and serial code number beneath it. If you want to make any changes, click on Edit. If not, you can start sending these tickets to your attendees.
B. Customize the default design
If you don't have a pre-designed ticket template, Ticket Generator has you covered. You can create your ticket design from scratch using the following design options:
- Add a background image from your system or via URL (in PNG, JPEG, or JPG format). Remember to keep the image size within 5MB. Alternatively, choose a solid background color by specifying a HEX Code or a CMYK color.
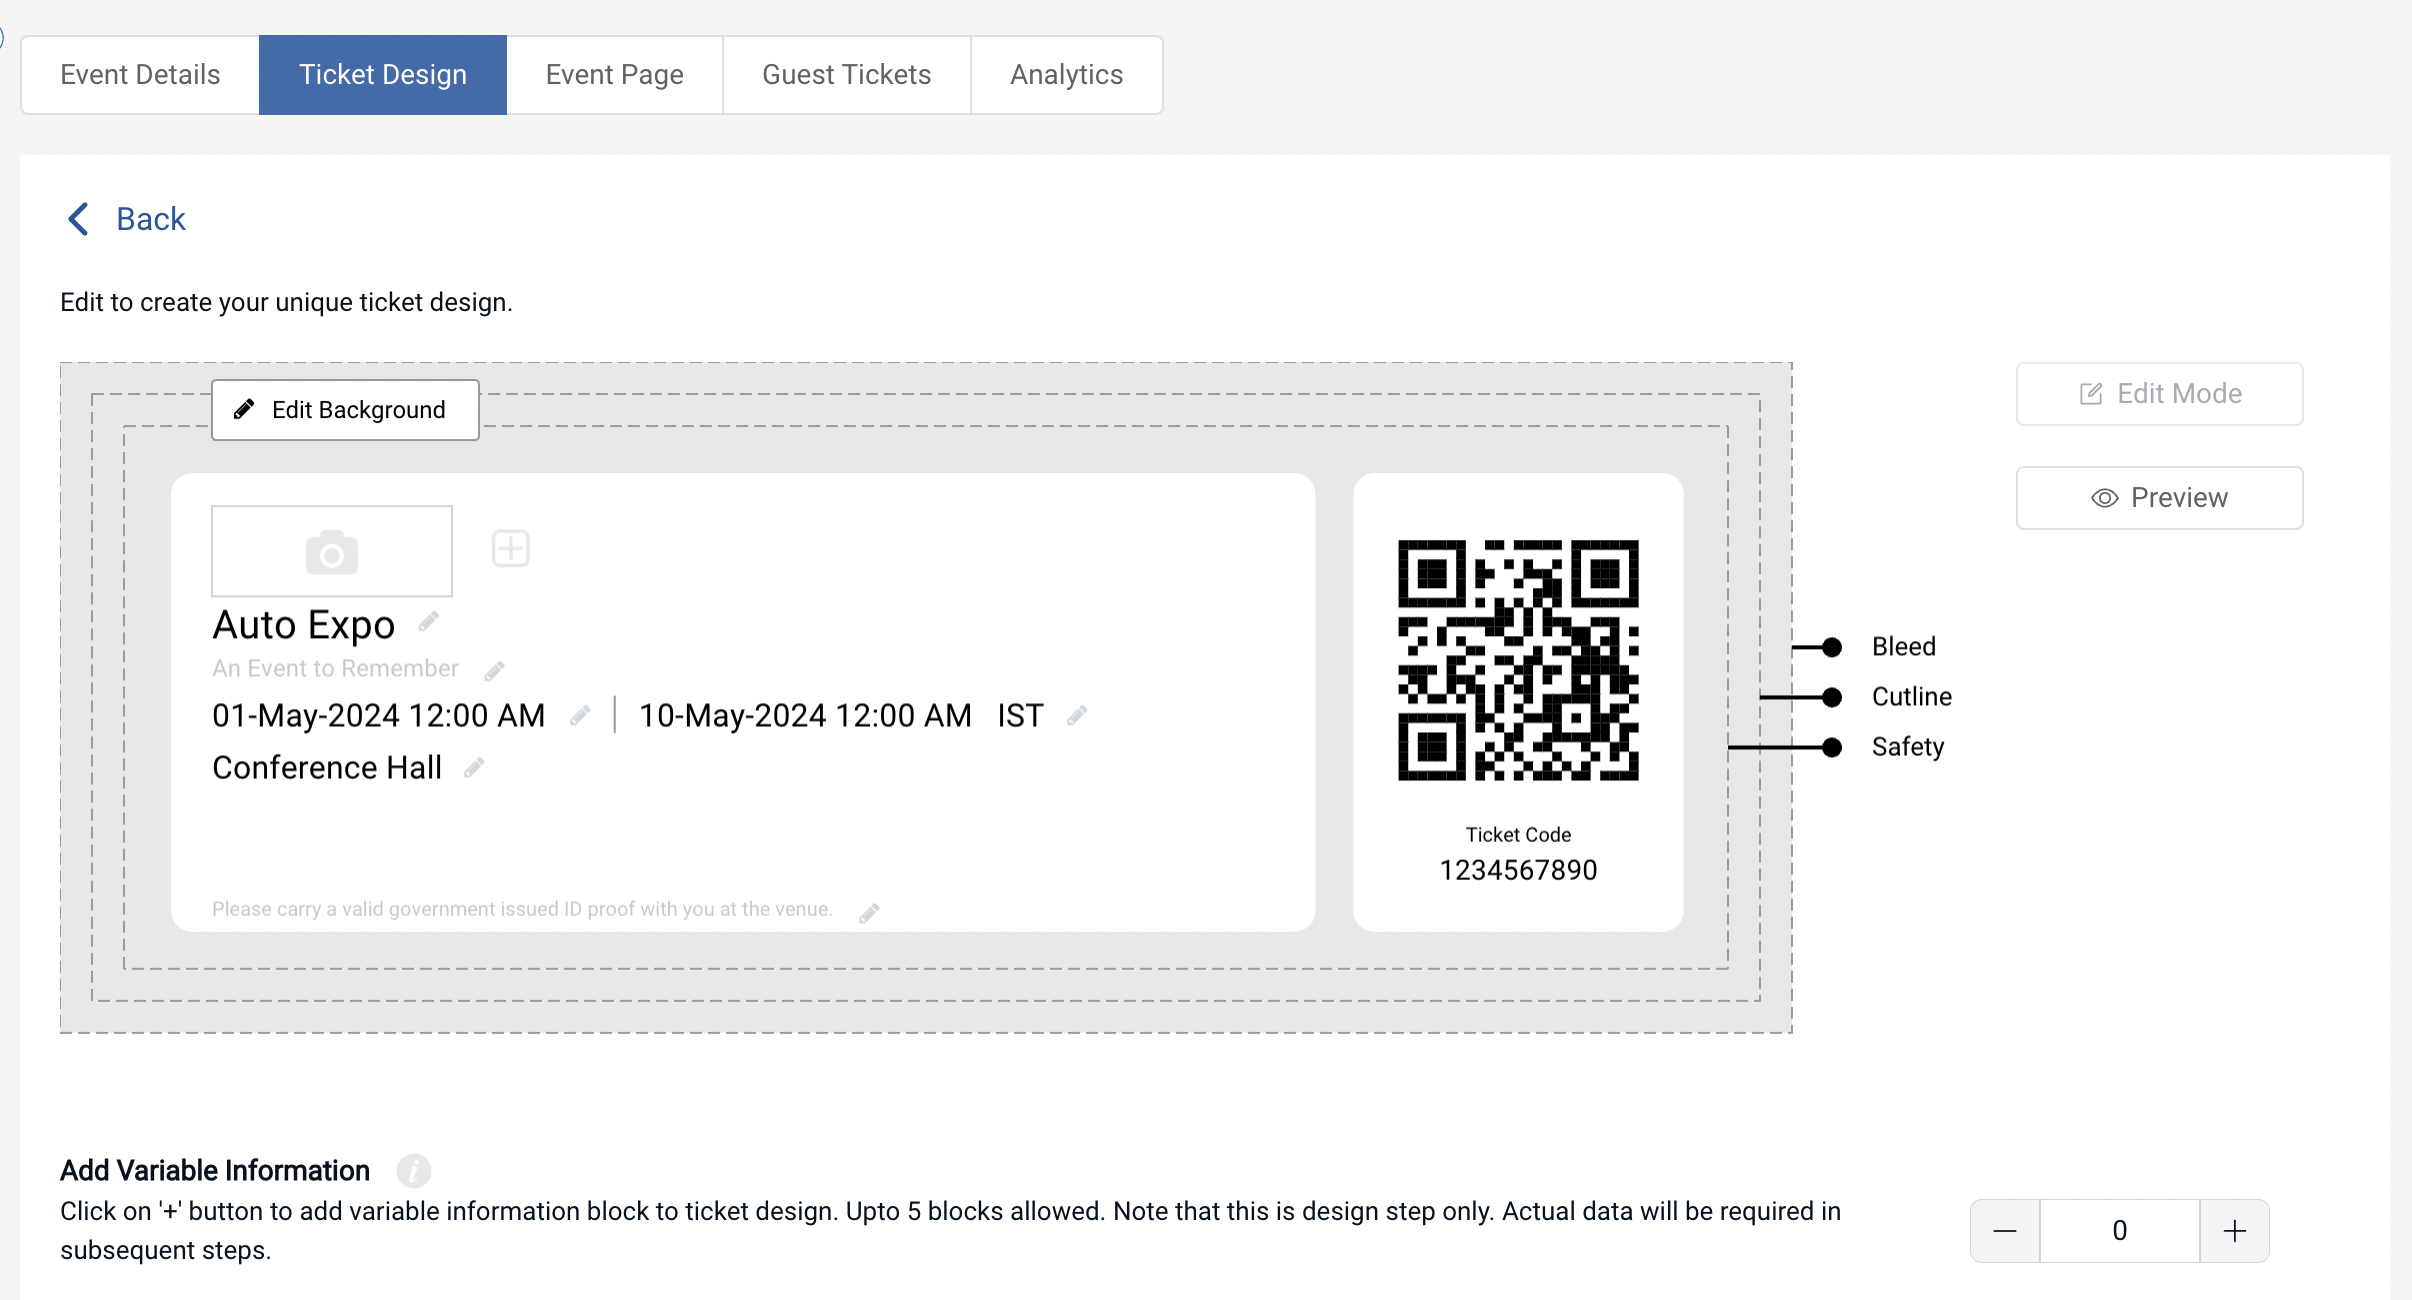
- Upload your brand logo from your system or paste the image URL (in PNG, JPEG, or JPG format). The image size should not exceed 5MB.
- Provide an event description, tagline, or any other useful information. This will be displayed directly under the event title and should not exceed 100 characters.
- Like in the previous design option, you can add variable information by clicking on the "+" sign.
C. Select from Template
- If you don't want to design the entire ticket but you still want to give it a fancy look, this option is right for you.
- Simply click on Choose from templates option to access this feature.
- Once clicked, you will see a number of pre designed templates to choose from.
- To select a template click on Select Template button right below the chosen template and that's it, your ticket, with all the information, will turn into a designer ticket.
Now you have your ticket ready with you. The next step is to download and send it to your customers.
2. Formatting the variable ticket information CSV or MS-Excel File
Once you have designed your ticket with variable information placeholders, you need to provide the actual variable ticket information data to generate your tickets. Follow these steps to format the variable ticket information CSV or MS Excel file correctly:
A. Understanding variable ticket information
Variable ticket information is unique data that can change for each ticket, such as row number, seat number, ticket price, guest name, etc. In contrast, fixed information includes details that do not change and are fixed across all tickets, such as the event name, date, location, etc.
B. Providing variable information data
After adding the variable information placeholders, you must provide the actual variable information data to generate your tickets.
How you provide data for variable information depends on your ticket delivery method, which includes generating and downloading the tickets, generating an email, generating via API, and generating via form link.
- For generating and downloading, you need to upload a CSV or MS Excel file and format it correctly by adding column headers for each variable data column and making each row correspond to one ticket.
- For generating and emailing, you need to upload a CSV or MS Excel file and specify the email addresses of the ticket recipients and unique variable information for each ticket.
- For generating via API, you need to provide variable information data via API parameters.
- For generating via a form link, you need to add the variable information field in the Event Registration form and ask users to enter the information.
3. Download your Ticket PDF
To download bulk PDF tickets from your account dashboard, choose the "Generate & Download" option from Ticket Generator's dashboard.
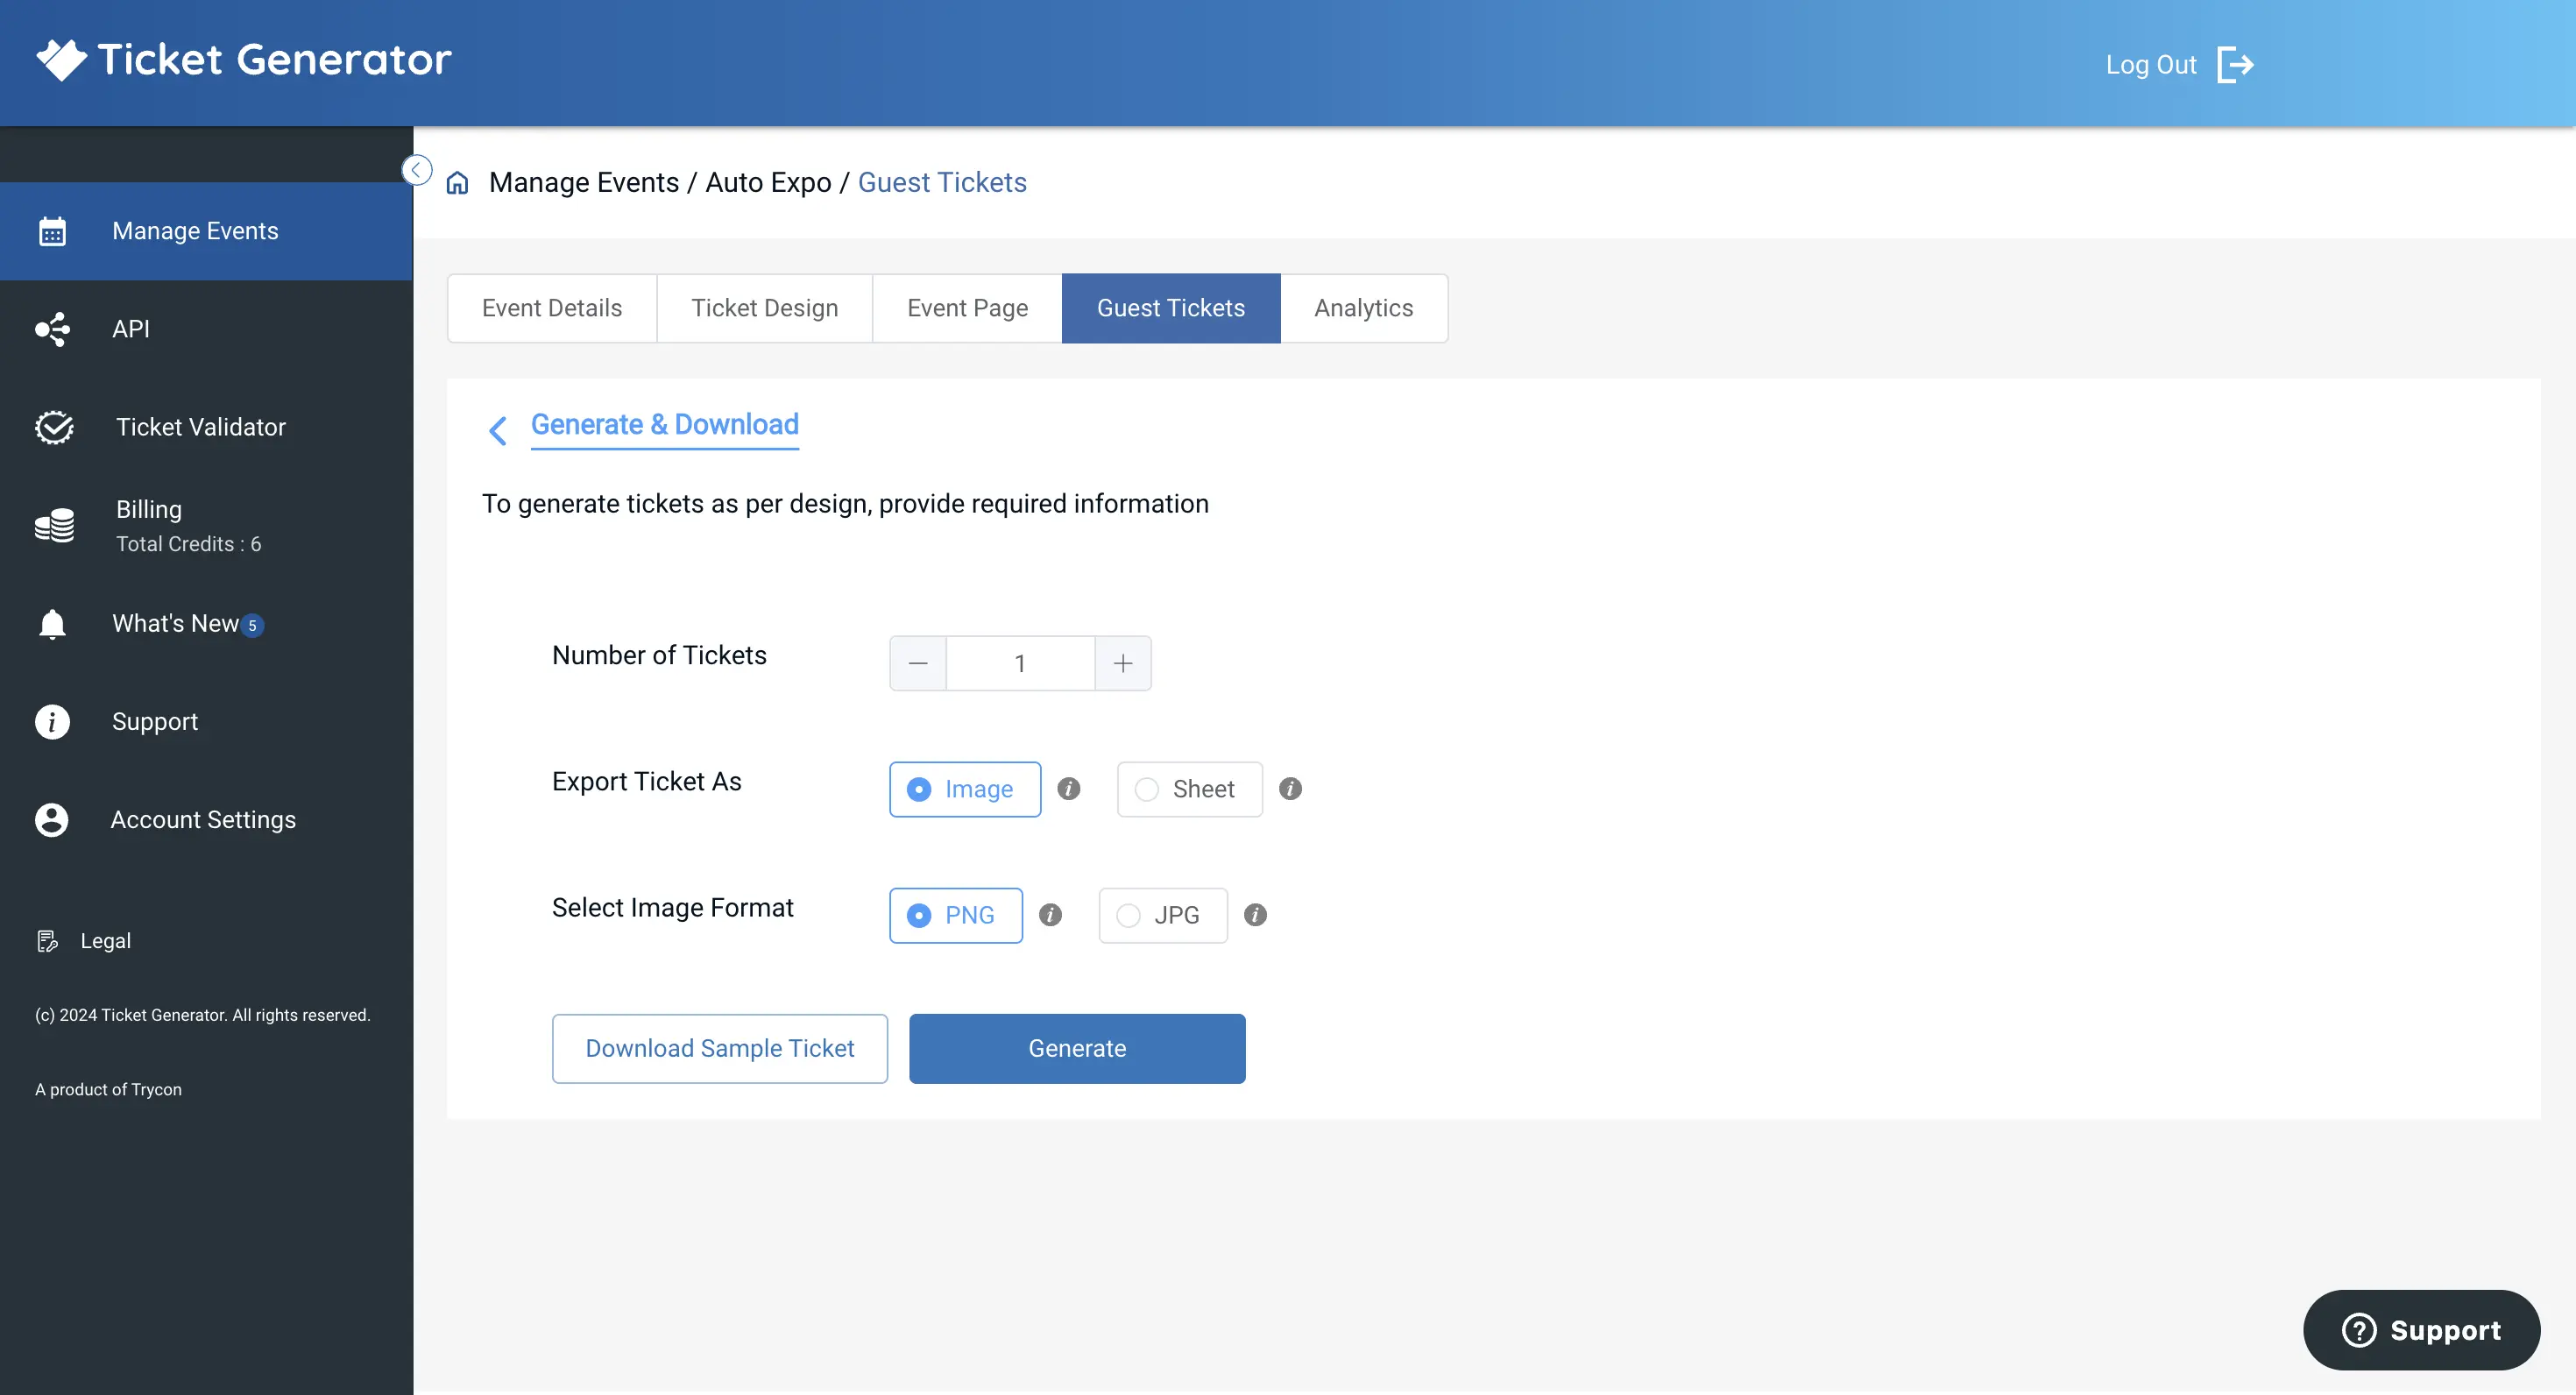
Once you have designed your tickets with variable information placeholders, you need to provide the variable information data to generate the individual tickets.
To do this, upload a CSV or MS Excel file containing the variable information for each ticket. Remember to format the spreadsheet correctly by:
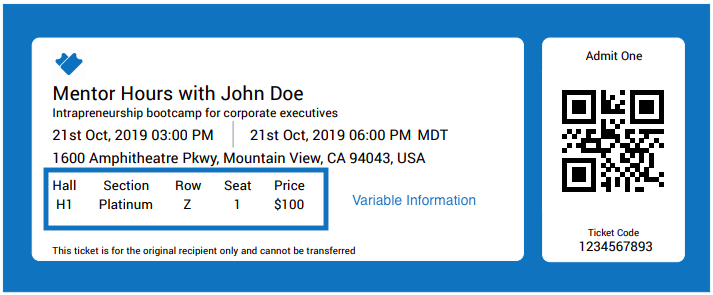
- Adding column headers in Row 1 to define the data in each column. Use descriptive headers that match the variable information you want to include in your tickets.
- Adding a row for each ticket, starting from Row 2 onwards. Add a "value" for each corresponding column header in each row. Make sure the data for each ticket is complete and accurate.
For example, if the data in the Excel sheet is this:
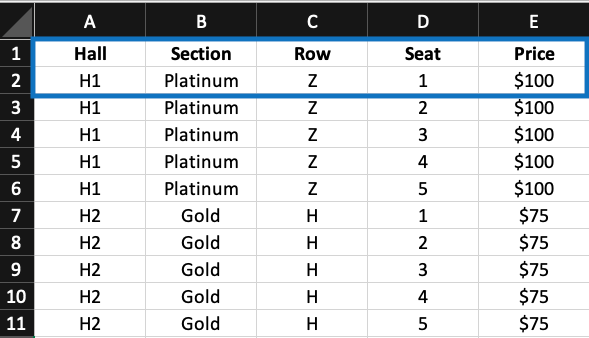
The data on the ticket will look like this:
Here are some best practices for formatting the file:
- Pay attention to the order of your columns. The first column in the file should match the first placeholder in your ticket design, the second column should match the second placeholder, and so on.
- Make sure the formatting of your variable ticket information is consistent across all rows. For example, if you have currency values in the "Ticket Price" column, ensure that all values are formatted with the appropriate currency symbol and decimal places.
- Check that there are no empty cells or missing values in your file. Each ticket should have valid information in all the corresponding columns.
Once you have uploaded the file, click the Generate button to generate your PDF tickets. Your tickets will be downloaded as a printable PDF.
How to Validate Tickets?
Now you sent the tickets to your attendees. Next, the question is, how do you validate the tickets? The good news is that you can do it with a simple online validation tool. With Ticket Generator's validator app, you can validate your tickets.
To do this, you need to add coordinators for the event within the Ticket Generator. Here is a step-by-step guide on how to validate tickets:
- Go to the "Manage Event" section from the dashboard.
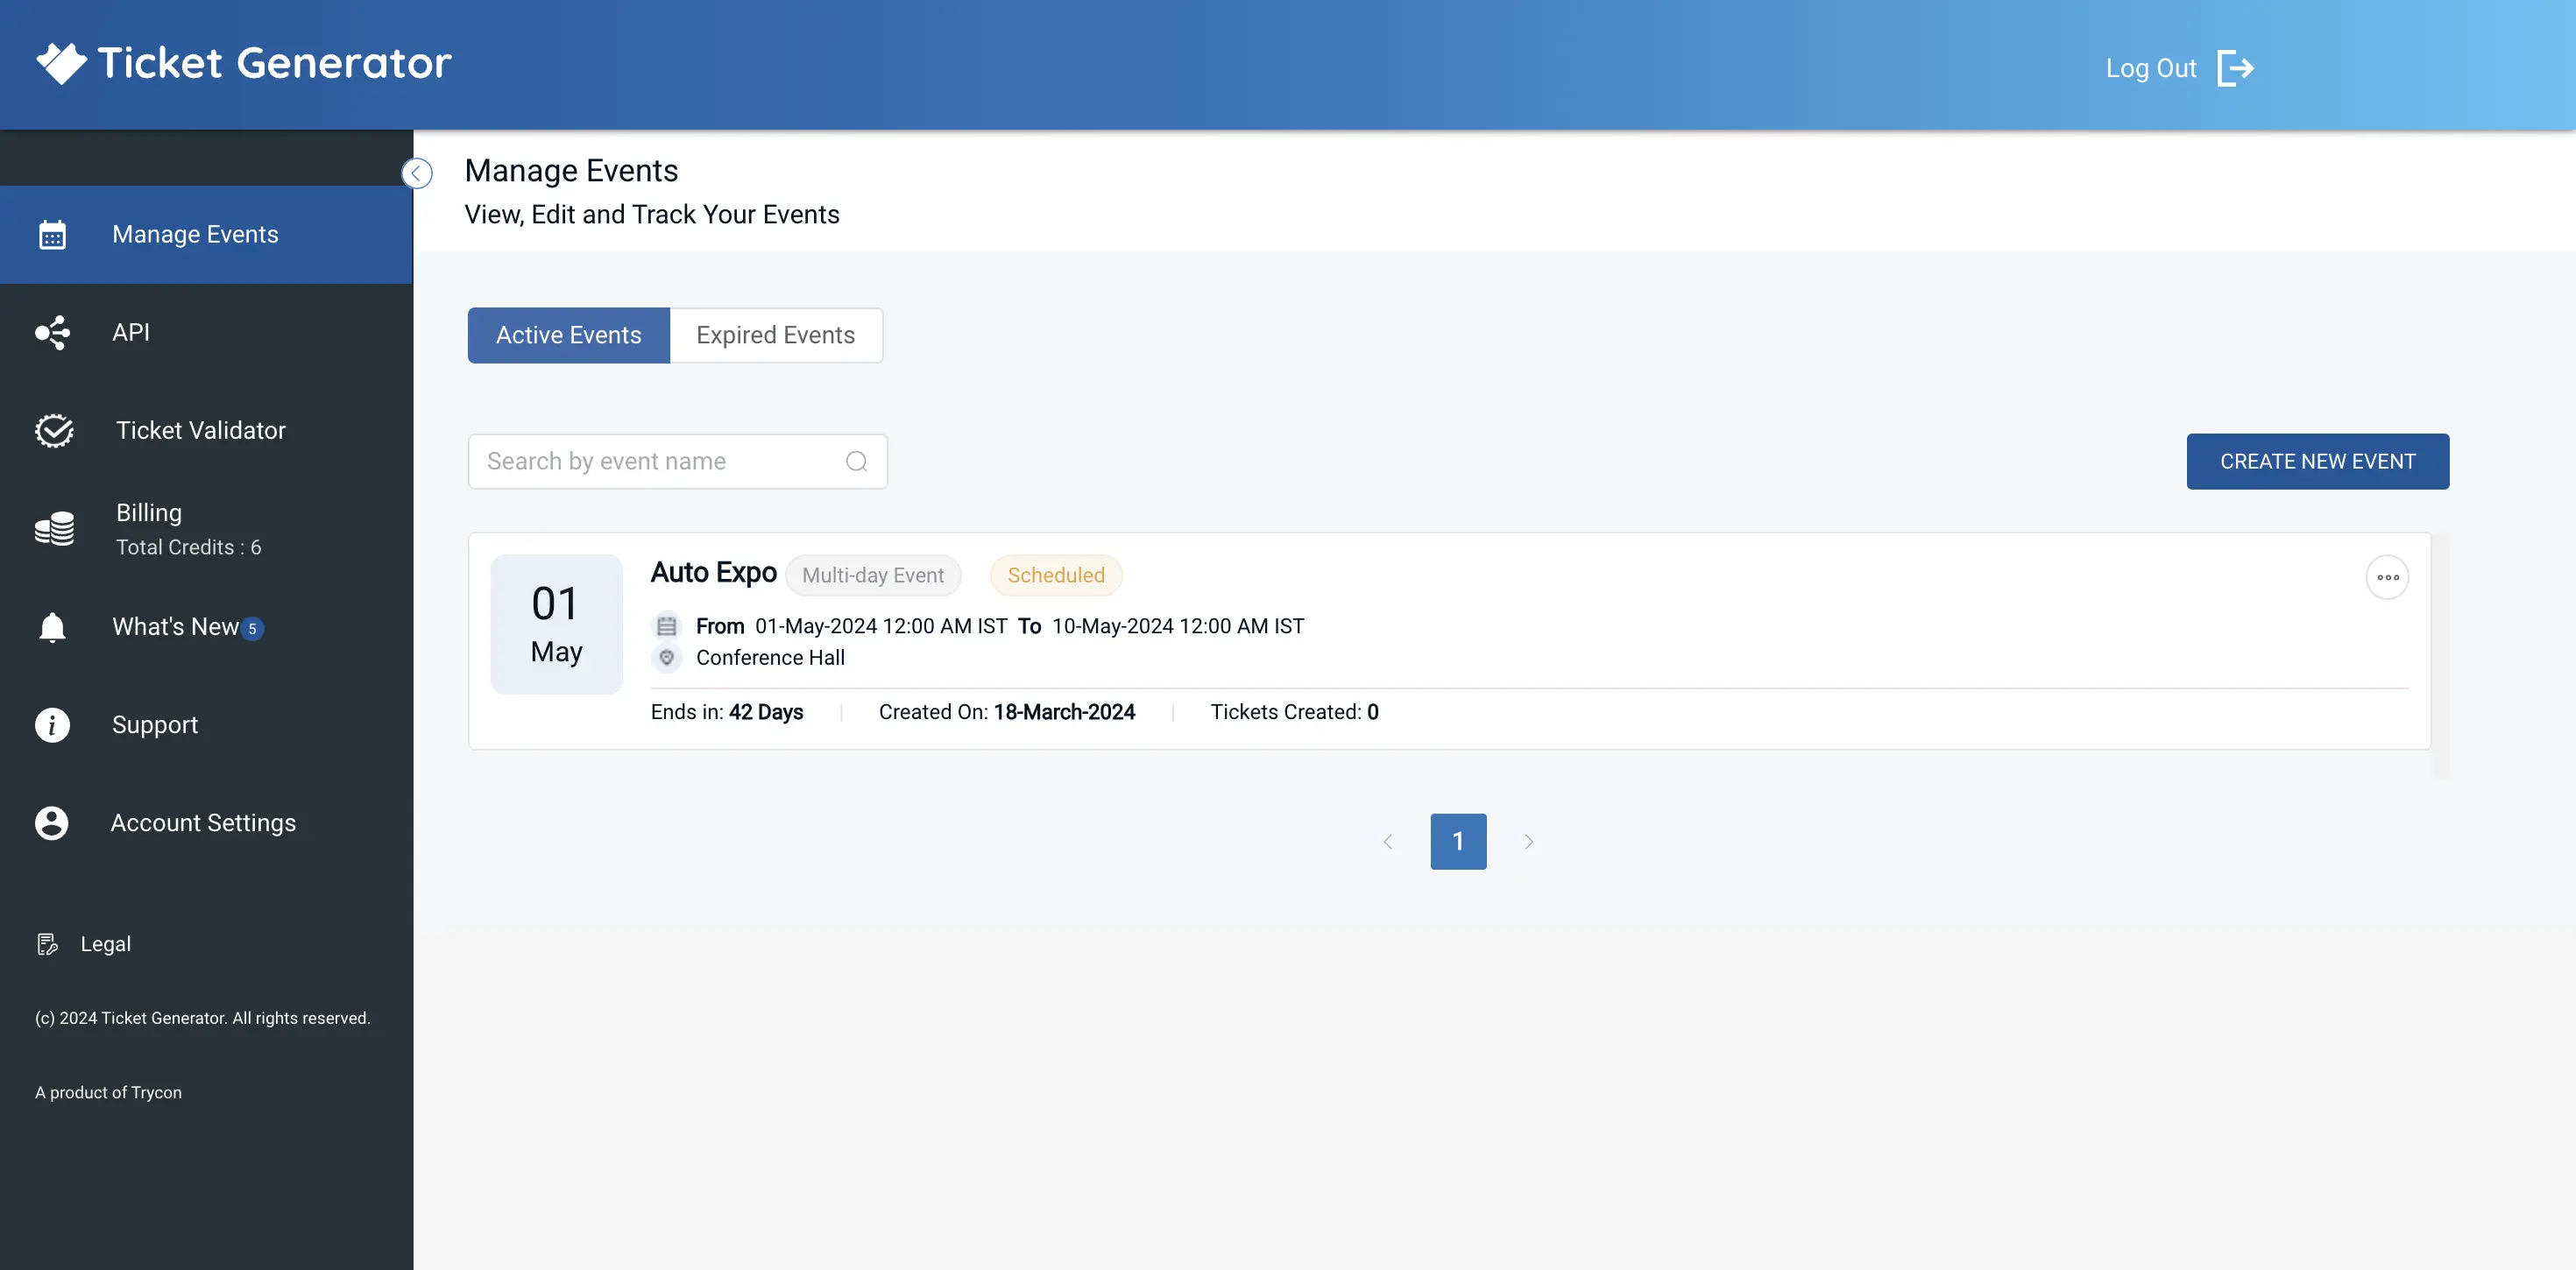
- Select the desired event and click the three horizontal dots under the "More" option.
- Click on "Add/Edit Coordinator."
- Specify the email address of each coordinator. The coordinators will receive an email invitation to log in to the Ticket Validator app on their phones.
- The coordinators can install the app on their smartphones through Google Play Store or Apple App Store and log in.
- Once logged in, the coordinators can open the app and select the event they need to validate tickets for.
- After selecting the event, they can click "Scan QR Code" to validate the tickets.
How To Use Ticket Validator App for Validating Event Tickets
That's It! The coordinators can now use the app to scan the QR code on each ticket and verify its validity. As the event coordinator scans it, he will see whether or not the ticket is valid.
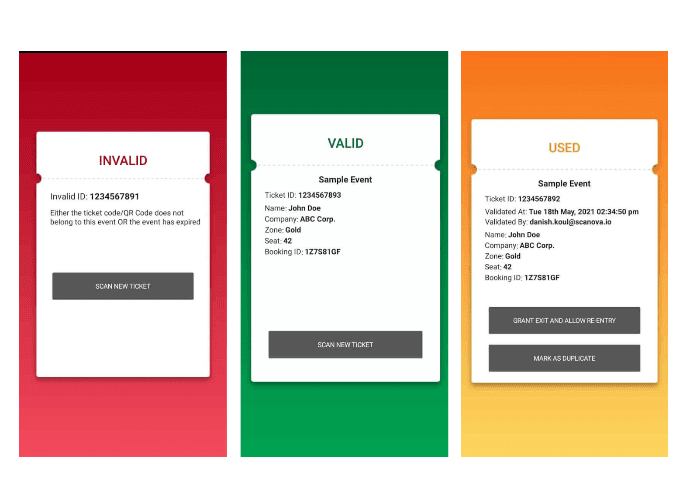
It can also enhance security and prevent fraud by making it more difficult for anyone to duplicate or modify the tickets.
Wrapping Up
Downloading PDF tickets is a simple and convenient way for event organizers and attendees to manage and access tickets. It can be used for various events, from small business meetings to large festivals and concerts.
The process is easy to set up and available on both desktop and mobile devices. With a few simple steps, you can have your own ticketing system in place in no time!
So what are you waiting for? Start customizing and download your first 10 free tickets now.


.gif)
