Ever hosted an event and wondered how attendees interacted with different sections or wished you could measure the number of tickets sold in real-time?
Or perhaps you've thought about how you can improve upon future events based on concrete attendee data from past ones? If so, you're in the right place.
If so, the concept of event tracking might be just what you need to enhance your future events and optimize overall attendee experiences.
In this comprehensive guide, we'll explore the importance of event tracking, how to set up tracking, and how to utilize the data you collect.
Let's dive in.
What is Event Tracking?
Event tracking is the process of monitoring and analyzing interactions at digital and physical events to provide actionable insights that guide optimal decision-making and event improvement.
This process involves capturing data about how attendees engage with different elements or activities at an event, such as
Sessions attended,
Speaker engagement,
Booth visits during trade shows, and much more.
At online events, these interactions could refer to details such as form completions, downloads, and even mouse clicks. For offline events, event tracking might include monitoring attendee movement, engagement with exhibits, participation in workshops, or feedback provided.
The ultimate goal of event tracking is to provide rich, quantitative data about attendee behavior and event performance.
These insights can be invaluable for event organizers in identifying successful elements of their events, uncovering areas of improvement, making data-driven decisions, and ultimately, enhancing the attendee experience.
Why Should Event Organizers Use Event Tracking?
Event tracking offers an in-depth understanding of how attendees engage with different elements of an event.
This real-time feedback is invaluable for you in assessing an event's effectiveness, helping them make informed decisions to drive improvement and optimize future events.
Below are three reasons why you should use event tracking:
1. Measuring attendee engagement
Event tracking provides a way to understand how attendees interact with various aspects of an event.
Analyzing data about attendance rates at different sessions, levels of participation in workshops, and duration of stays at exhibition stalls will give you a comprehensive understanding of attendees' behavior.
With this data, you can better understand how to engage attendees and improve your event.
You can also identify which sessions and activities are the most popular among attendees through event tracking. This can help them prioritize resources and focus on aspects of the event that attendees find most useful or engaging—ultimately leading to a more successful event.
2. Analyzing Event ROI
Event tracking involves monitoring sales and revenue streams, including ticket sales, merchandise sales, and sponsorship funds.
You can calculate a venue's revenue from ticket sales and other sources—such as concessions or merchandise sold at the event—and then compare that figure to its expenses. This will help you evaluate how profitable an event was for the venue.
With Ticket Generator, you can monitor ticket sales in real-time and calculate revenue from each ticket sale. This can help you determine how many tickets were sold, allowing you to compare this figure to the venue's capacity—the maximum number of people that can be accommodated at an event.
Event tracking can also help event organizers assess the effectiveness of sponsorships and partnerships. Monitoring metrics such as visibility and engagement will help you determine whether partnering with sponsors serves the conference's marketing objectives.
3. Identifying areas for improvement
Event tracking can reveal potential bottlenecks such as long registration queues, overcrowded sessions, or inadequate facilities. This information can help you make changes to improve future events.
For example, if attendees were frustrated by long registration queues and this was the main reason they didn’t attend a session, you could consider contracting more staff or using an online registration system like Ticket Generator in future conferences.
How to Set Up Event Tracking?
Setting up event tracking is a straightforward process. You just need event-tracking software and some basic information to get started.
Here's how you can set up event tracking with the help of Ticket Generator:
Step 1: Event Setup
Go to Ticket Generator and register for an account. Rest assured, no credit card information is required for registration. Once completed, you'll receive ten free credits to get you started. Each credit equates to the creation of one ticket.
Now, select the Create New Event option. Add event details such as the name, date, description, location, and time. When you're finished, click on Create.
After this, your event will be created. After creating your event, select it from the Manage Events tab. Find the Guest Tickets section and click on it.
Then, click the New Ticket(s) drop-down box and choose Bulk Tickets to manufacture tickets in bulk, or Single Ticket to create a single event tickets. Use this option to create and distribute event tickets in batches.
And voila! You've successfully set up your event.
Step 2: Ticket design
When your event registration page is ready, you can create the tickets that will be used for the event.
a. Custom design option
If you don't have a ready-made design, click on Edit Design option, this option will help you design passes from scratch. You'll see a ticket on the screen having all details you added in the first step.
You'll get the following options for customization:
Ticket background: Here, you can use an image or color as the pass background. If you want to add an image, you can use the upload option or fetch it using a link. The image will be required in JPG, PNG, or JPEG, formats
Logo: It'll help you add your business's logo to the passes. Doing so can help your branding effort. Note that the logo will also be needed in PNG, JPEG, JPG, or formats. Also, the logo size shouldn't exceed 5 MB
Event Description: Here, you can add a tagline, notes, description, or any important details
Variable information: Like the previous design variant, it helps you add variable details to the passes. You simply need to click on the +' icon
b. Choose from templates
If you don't want to design the entire ticket but you still want to give it a fancy look, this option is right for you. Simply click on Choose from templates option to access this feature.
Once clicked, you will see a number of pre designed templates to choose from. To select a template click on Select Template button right below the chosen template and that's it, your ticket, with all the information, will turn into a designer ticket.
c. Upload your own design
This one will help you use your own ready-made design as a template for the passes. Just select the Upload Own Designoption and click on the Upload Ticket Design option to upload your template.
Next, you will be able to position the ticket ID on the passes as per your wish.
You will also find a +' button on the screen. Using it, you can add variable information to the tickets. This will be unique for every ticket. For example, attendee name, row, seat number, etc.
You can add five such blocks on each pass. You can choose the number of blocks in this step. The actual data will be taken in subsequent steps.
After finalizing everything, click Done.
Step 3: Ticket Delivery
After you have finalized the ticket design, you must choose how the tickets will be distributed. Here are the multiple ways you can send out your tickets:
1. Generate form link
Create a registration page for the event. A custom ticket is auto-generated and sent to the attendee when a registration is submitted and accepted.
2. Generate and download
Download printable tickets in PDF format.
3. Generate and send
Tickets are directly emailed or sent via SMS to guests. You can input up to 1,000 emails or phone numbers.
4. Generate via API
Integrate with your information system using the Ticket Generator API.
How to validate event tickets?
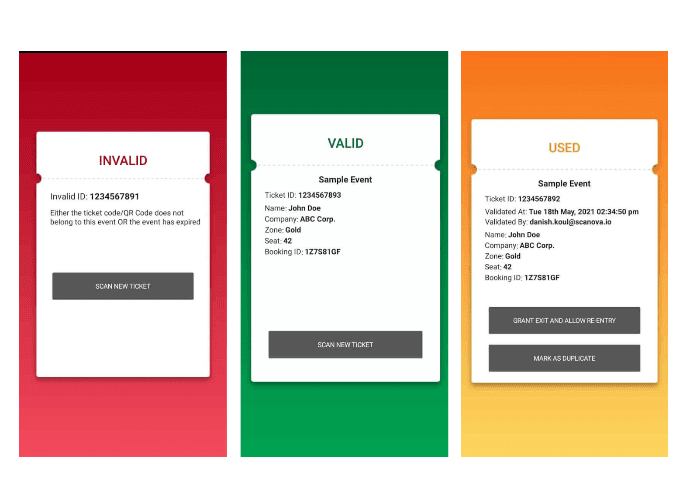
Finally, on the day of the event, you can validate your custom tickets:
Download the Ticket Validator app and sign in from the App Store or Play Store.
Select the specific event you want to validate tickets for.
Press the "Scan QR Code" button.
Start scanning your guest tickets. The app will tell you if each ticket is valid or not.
It can also enhance security and prevent fraud by making it more difficult for anyone to duplicate or modify the tickets.
Event tracking: How to Track Your Event Performance?
The event tracking feature allows you to track the number of people visiting your event page and the number of guests who have purchased tickets.
Once your event is over, you can get a performance report from the Ticket Generator app:
Download the Ticket Validator app and sign in from the App Store or Play Store.
Select the specific event you want to track tickets for.
Press the "Generate Report" button. The app will generate a report with an overview of all the ticket data (including sales and validation).
The report will show the number of tickets generated, sold, and validated. It will also list the names of all people who bought tickets and whether they're valid. With this data, you can make better decisions about your event planning.
For example, if you have too many unsold tickets, consider lowering the price or offering a discount. You can also use this data to see how well your attendees respond to marketing campaigns.
Conclusion
Now you know everything from creating events to analyzing the data. What's remaining is your implementation. Start with Ticket Generator now and start designing your tickets. Your first 10 tickets are free.
Yashika Tangri is an amazing marketing manager who operates from Trycon Technology's Noida office. Her name signifies success and fame, and she has certainly lived up to these expectations.
At work, Yashika is a highly efficient digital marketing organizer and a source of inspiration to her colleagues with her positive demeanor and professional work ethics. Despite being a lifelong student of science, Yashika decided to pursue a career in marketing in 2018.
After work hours, Yashika enjoys creating new playlists on Spotify, and she is an avid reader who finds solace in escaping reality through the pages of mythology books


.png)