

Designing a Christmas event ticket can be a fun and creative process, but it can also feel overwhelming when you are not sure where to begin.
Your ticket is often the first impression guests get of your event. This applies whether you're planning a holiday party, a charity fundraiser, a school concert, or a corporate Christmas gala.
A well-designed ticket does more than grant entry. It sets the tone, reflects your theme, and builds excitement before guests arrive.
Here’s a basic overview: First, think about the visual design elements of your ticket. This includes your color scheme, fonts, layout, and graphics. Choose colors that feel festive and warm, but make sure they work well together and keep the text readable. Pick a font style that is easy to read and matches the tone of your event, whether playful, elegant, or formal.
Fun graphics like snowflakes or Christmas trees can make your ticket look great. Just keep them subtle so they don’t distract from the main information. Once your visual style is set, start adding the essential details. This typically includes the event name, date, time, venue, and any important notes such as entry rules or dress code.
Make sure every detail is clear and easy to find at a glance. A clean, well-organized ticket helps guests plan ahead and reduces questions before the event.
By following these easy tips, you can design a ticket that’s festive, professional, and clear for your guests.
A. Elements to include in Christmas Event Tickets
Designing a Christmas event ticket takes a bit of planning. It should feel festive and also give guests all the important details.
Here are the key elements you should include to make your ticket both festive and functional.
1. Event name and logo
The event name and logo should be the first things guests notice. Place them at the top of the ticket to build brand awareness and help people identify the event quickly.
Make sure the text is clear, legible, and sized correctly. A crisp event logo also makes the ticket look more professional and polished.
2. Date, time, and venue
Always include the date, start time, and venue details. These details help guests plan their arrival and avoid confusion.
Make sure you use a readable font size and consider bold or italic styling to make these elements stand out.
Adding the full address can be helpful for guests who are unfamiliar with the location.
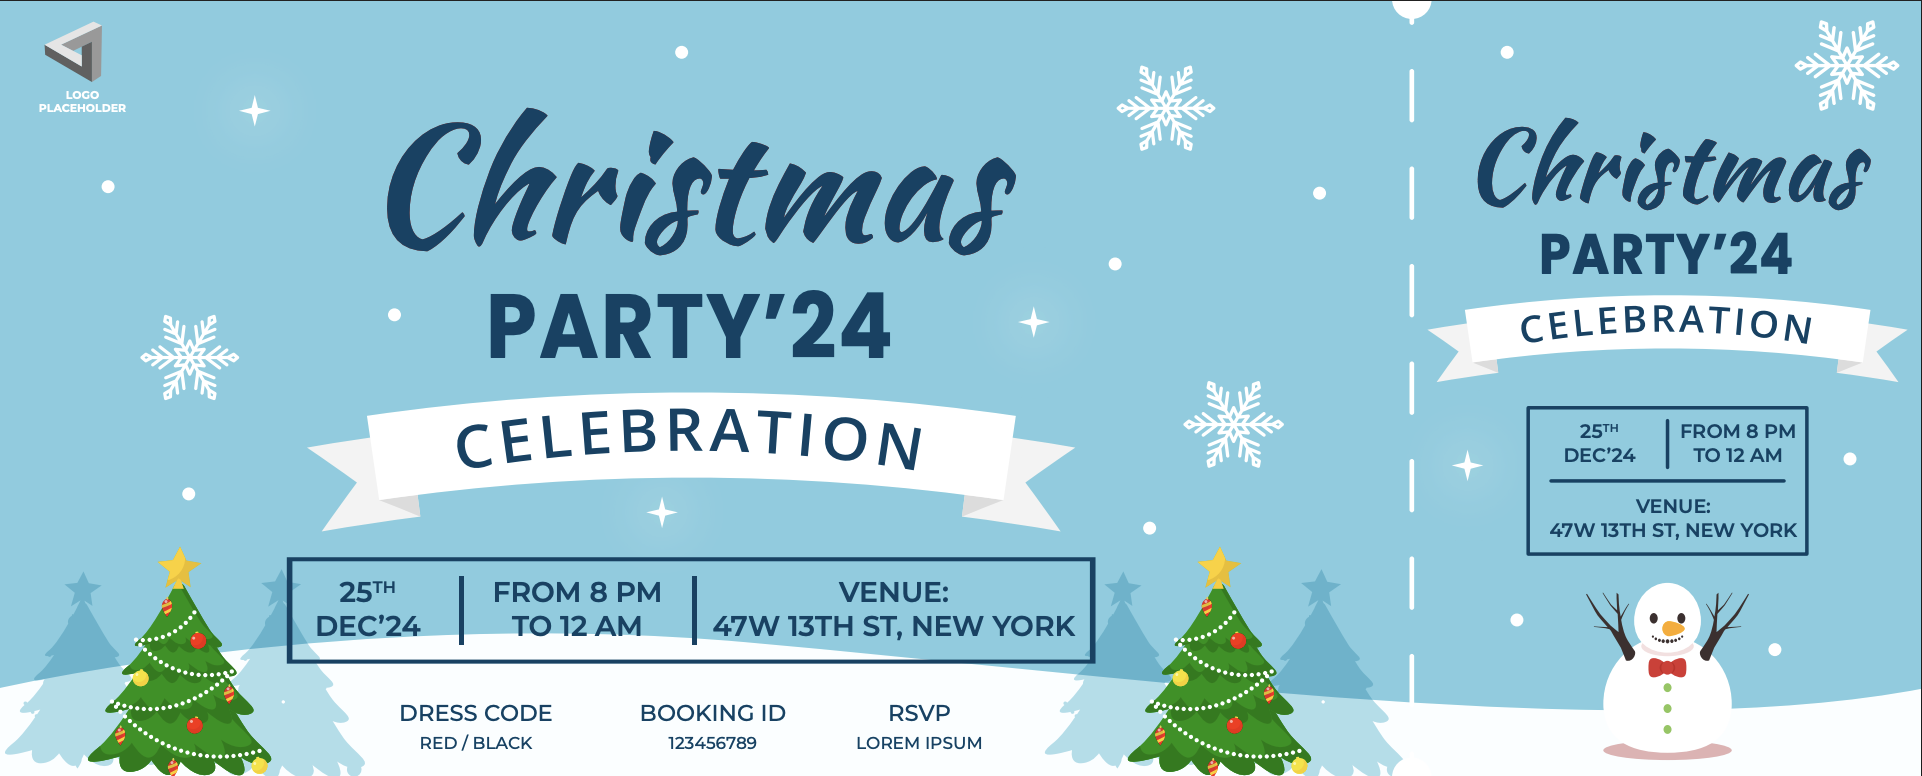
3. Ticket details
This section explains what type of ticket the guest is holding. Include details like the ticket type (VIP, General, Family Pass, or Staff), the price, seating information, and the dress code if there is one.
You can use bullet points or a small table to make these details easy to scan. Clear ticket details help volunteers guide attendees more efficiently during entry.
4. Festive graphics and colors
Christmas tickets feel more lively when they use holiday-themed visuals like snowflakes, ornaments, stars, or Christmas trees.
Choose festive colors like red, green, gold, blue, or silver that match the event’s theme.
However, keep designs balanced. Overly busy graphics can make the ticket hard to read. A clean layout with one or two well-placed festive elements often works best.
5. QR Code for entry
A QR Code makes check-in fast and secure. Place the QR Code where it is easy to scan, preferably in the lower corner or on the right side of the ticket.
Ensure there is enough white space around it to avoid scanning issues.
Using a unique QR Code for each ticket helps prevent duplication and gate-crashing, which is why many large events rely on QR-based entry.

B. How to design a Christmas event ticket using Ticket Generator?
Designing a Christmas event ticket becomes much easier when you use a tool built for fast ticket creation and secure entry.
Ticket Generator helps you design, customize, and deliver tickets without any design software or technical skills.
Follow these steps to create your Christmas event tickets.
Step 1: Sign up on Ticket Generator
Start by creating your account on Ticket Generator. You can sign up with your email or Google.
Once you log in, you will land on your dashboard, where you can create events, design tickets, and manage everything in one place.
Step 2: Create your event and choose a template
Then, click Create Event and enter the event name, date, time, and venue. Next, choose Upload Own Design, Start From Scratch, or pick a ready-made Christmas template.
Ticket Generator offers multiple holiday-themed templates, so you can select one that matches your event style and customize it easily.
Step 3: Add your branding elements

Make your ticket look professional by adding your logo, brand colors, and fonts. You can also upload images, Christmas graphics, or sponsor logos.
A branded ticket builds trust and makes your event feel well-organized.
Step 4: Add a secure QR Code to each ticket

Ticket Generator generates a unique QR Code for each ticket automatically. This QR Code on Christmas event ticket lets you validate tickets with a quick scan at the event. It helps prevent duplication, fake tickets, or gate-crashing.
Step 5: Personalize tickets (Optional)
If you want each ticket to include a guest name, seat number, or ticket type, you can upload your attendee list.
Ticket Generator will personalize each ticket automatically. This is helpful for events with reserved seating or VIP sections.
Step 6: Generate tickets in bulk
Once your design is ready, create as many tickets as you need in one go. Ticket Generator’s Bulk Generate feature saves time and avoids manual errors.
This step is useful for large Christmas events such as community festivals, concerts, or school programs.
Step 7: Share your tickets digitally
You can download all tickets as PDFs for printing if your event uses paper tickets. Or you can share digital tickets instantly through:
- SMS
- Direct links
Digital delivery is faster and ensures guests always have their ticket on their phone.
Step 8: Validate tickets at the event
At the venue, open the Ticket Validator App on any smartphone. Scan each QR Code to check whether the ticket is Valid, Invalid, or Duplicate.
This keeps your entry secure and speeds up check-in lines.
Step 9: Get and monitor real-time insights
Ticket Generator gives you a live dashboard that shows:
- How many tickets were created
- How many were delivered
- How many were scanned
- Final attendance numbers
These insights into your Christmas event ticket sales help you understand turnout and improve future Christmas events.
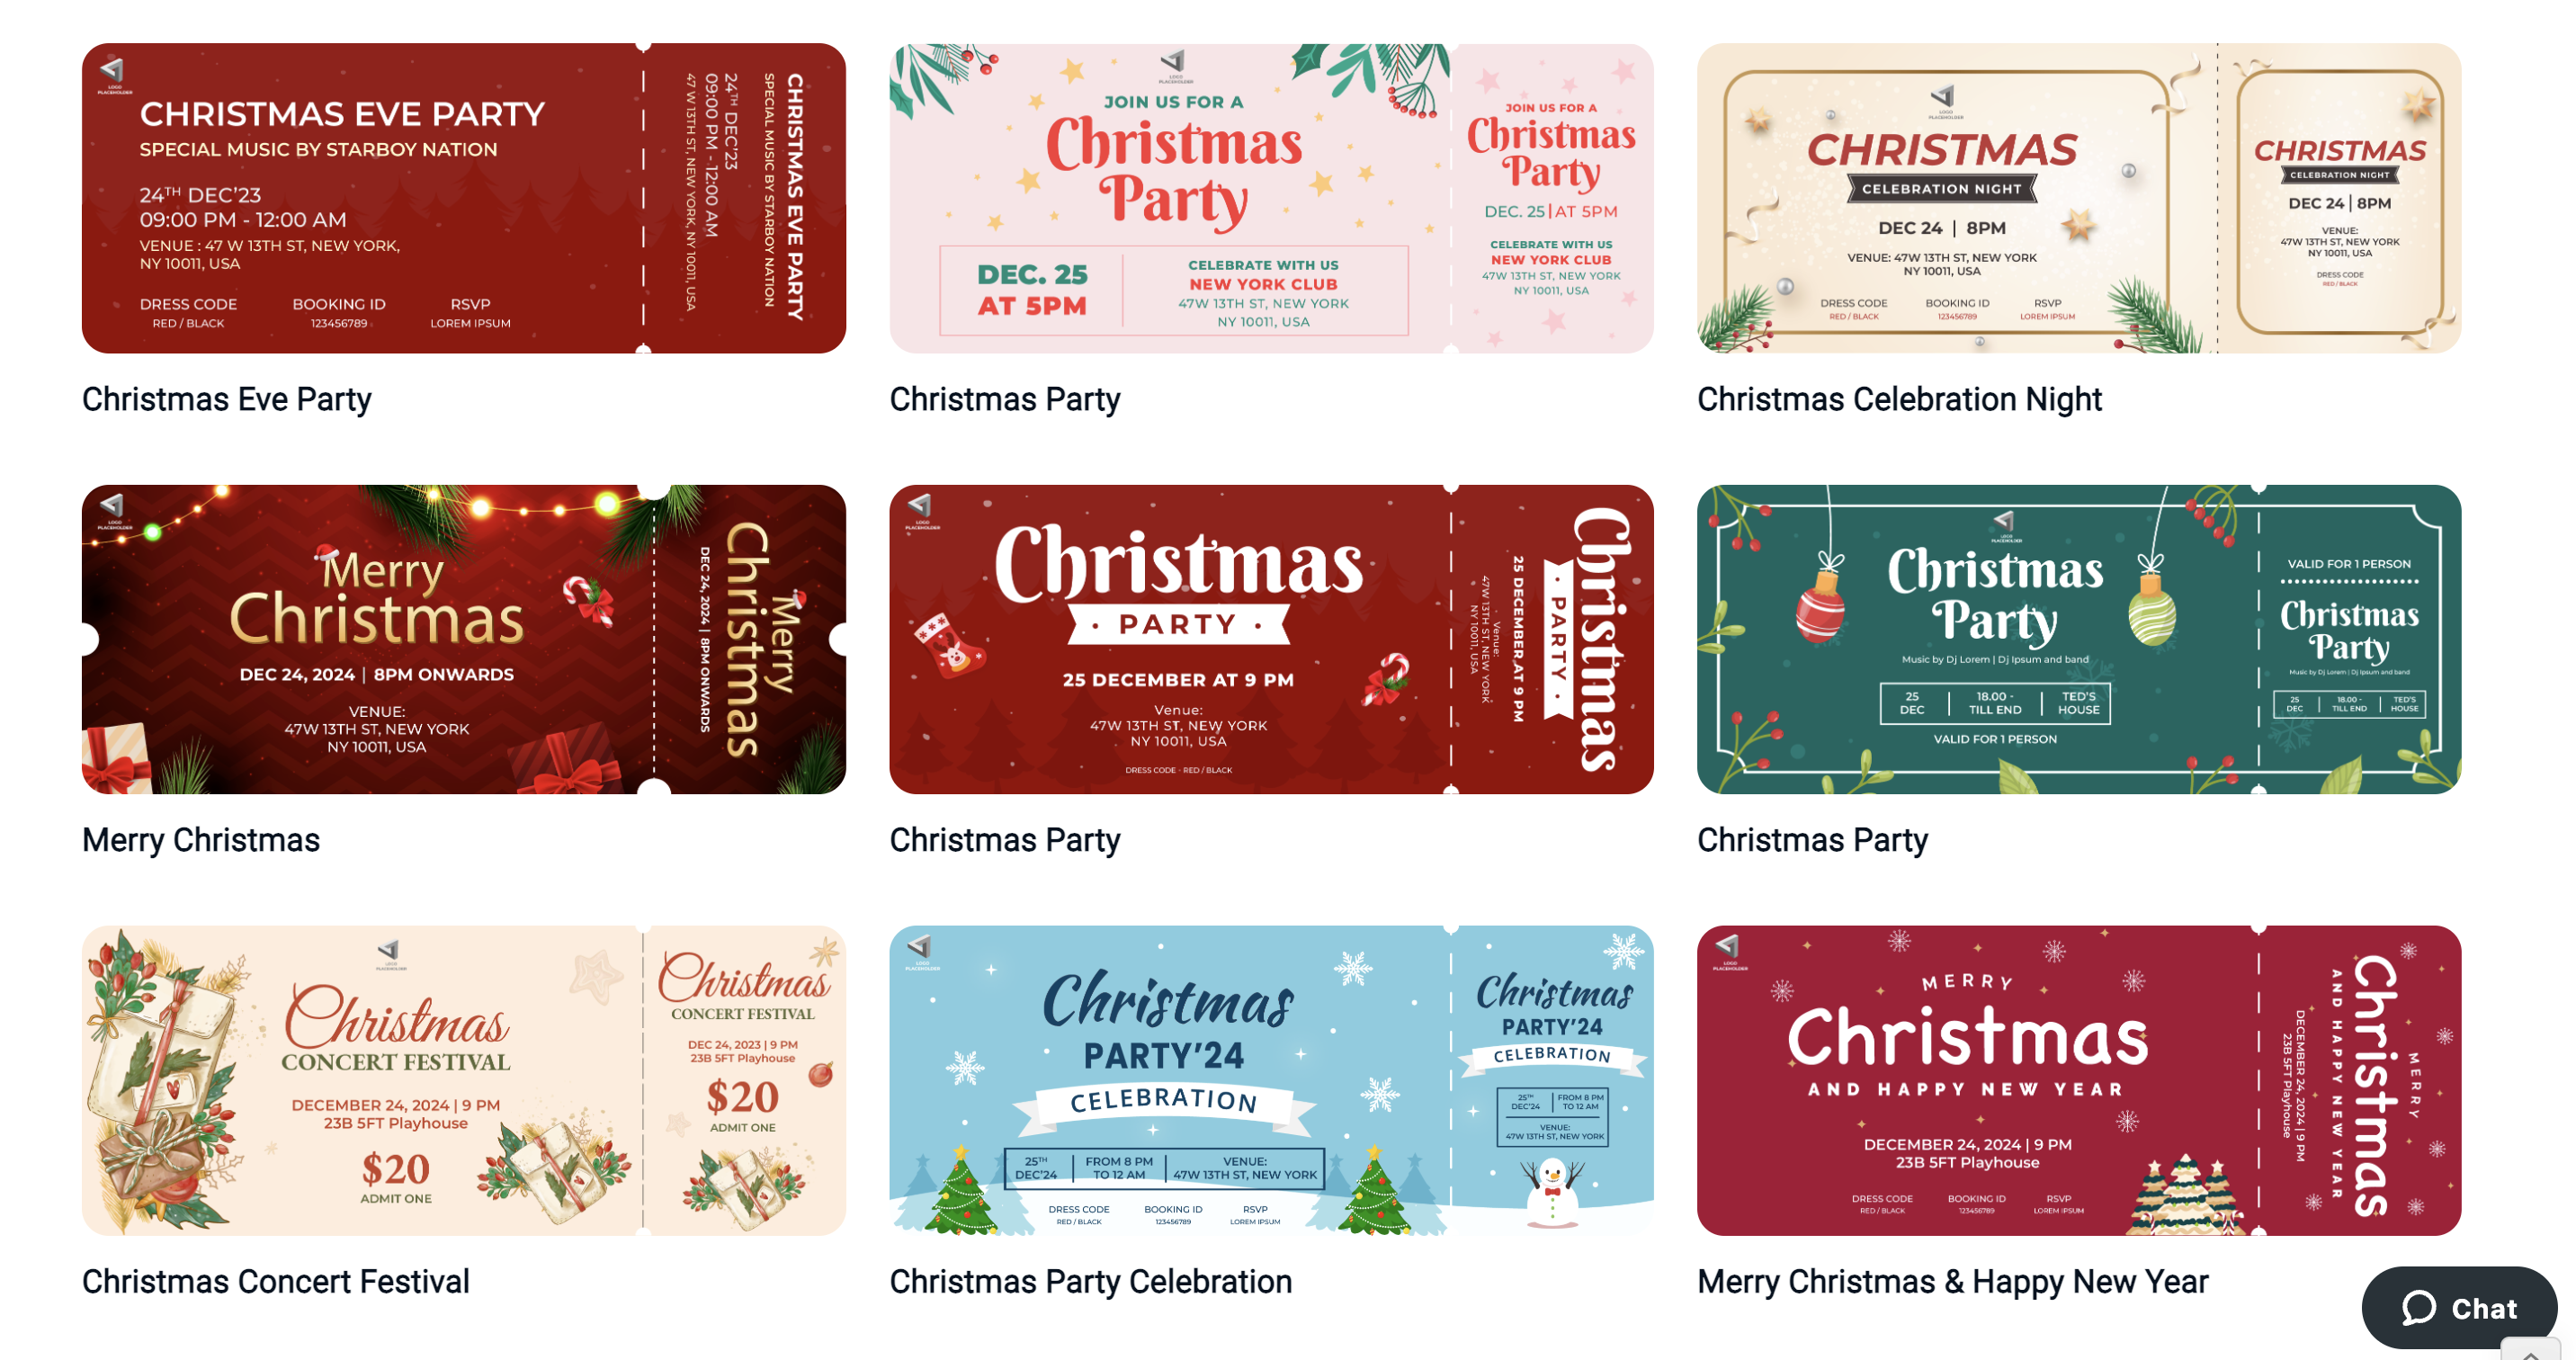
C. Tried and tested ticket template ideas
Designing a Christmas event ticket becomes much easier when you start with a clear style in mind. Your ticket should reflect your event’s theme, mood, and audience.
Below are template ideas and simple design tips that can help you create tickets that look festive, clean, and professional.
1. Classic red & green template

This is the most popular Christmas style. Use bright red, deep green, white, and gold accents.
Add simple icons like holly leaves, stars, bells, or snowflakes. This design works well for school events, family festivals, and community celebrations.
2. Elegant gold & navy template
A gold-and-navy theme gives your ticket a premium, evening-event feel. Use serif fonts and subtle sparkles or gold foil textures.
This style fits charity galas, concerts, and black-tie Christmas dinners.
3. Minimal winter template (White + soft blue)
You can use clean lines, lots of white space, and gentle blue tones for this one. You can even add small snowflakes or winter forest silhouettes.
This style looks modern and works well for corporate Christmas events or ticketed workshops.
4. Kids & family-friendly template
Here, you can use playful fonts, bright colors, and cartoon-style graphics (Santa, reindeer, candy canes).
Keep text large and simple so parents can read it easily. Perfect for school programs, kids’ parties, or Santa meet-and-greet passes.
5. Vintage Christmas template
Think old-style Christmas postcards: muted reds, rustic greens, and classic typography. Add textures like paper grain or faded borders.
Use script fonts for headers and clean fonts for details. Ideal for traditional concerts, Christmas markets, or church events.
6. Snowy night template
For this template, you should use dark backgrounds (navy or midnight blue) with white or silver text.
You can even add falling snow graphics or a silhouette of a Christmas town. This dramatic style works well for music nights, theater shows, and outdoor winter festivals.
D. Design tips to make your ticket stand out
Below are simple but powerful design tips that bring your Christmas ticket together and improve readability.
1. Use visual hierarchy
Make important information larger. Start with the event name, then date and venue, then ticket type. Guests should be able to understand the key details within one second.
2. Choose fonts that are festive but easy to read
Decorative fonts work for titles. For details, stick to clean sans-serif or serif fonts. Avoid thin or overly curly fonts for small text.
3. Keep your layout balanced
Leave enough empty space around text and graphics. Crowded designs make the ticket look unprofessional. Aim for a clean, simple layout with one main graphic element.
4. Use high-contrast colors
Dark text on light backgrounds, or light text on dark backgrounds, makes details readable. This also improves QR Code scanning reliability.
5. Add a highlight line
One short sentence can increase excitement. For example:
- “Featuring live choirs and festive treats”
- “A magical winter show for all ages”
- “Join us for a night of music, lights, and celebration”
This small touch adds personality and helps sell the event.
6. Place the QR Code in a clean area - Always
Keep the QR Code away from busy graphics. Maintain some white space around it to avoid scanning problems. Avoid placing it near edges or over gradients.
7. Test your ticket before finalizing it
Print or preview it on a phone. Check if every detail is readable. Scan the QR Code to confirm it works. Make small adjustments before generating all your tickets.
Conclusion
Designing a Christmas event ticket does not have to be difficult. When you choose the right colors, use clear fonts, and place key information where guests can find it fast, your ticket becomes both festive and easy to understand. Adding a unique QR Code also helps you create a smooth and secure entry experience for your event.
Ticket Generator makes the whole process easier by giving you ready-made templates, custom design tools, bulk ticket creation, and simple QR-based validation. With just a few steps, you can design a ticket that looks professional and matches the spirit of your Christmas celebration.
A well-designed ticket sets the tone for your event and helps everything run more smoothly. Start creating yours today and give your guests a Christmas experience they will remember.
FAQs: How to design Christmas event tickets?
1. What are the essential elements to include in a Christmas event ticket design?
A Christmas event ticket should include the event name, date, time, venue, and ticket type. You can also add your event logo, festive graphics, and a unique ticket number if needed.
Most events now include a QR Code to speed up check-ins and prevent duplicate entry.
Make sure the font is readable, and the color scheme matches your Christmas theme.
2. What are some tips for creating a visually appealing Christmas event ticket?
Use festive colors like red, green, gold, or blue, but keep the layout clean so that the text remains readable.
Choose one main graphic, such as snowflakes, ornaments, or a Christmas tree, and avoid clutter.
Use decorative fonts for headings and simple fonts for details. If printing, choose good-quality paper and consider finishes like matte, gloss, embossing, or foil for premium events.
3. Where can I find free Christmas event ticket templates to customize?
You can find free Christmas ticket templates on platforms like Canva and Ticket Generator.
Ticket Generator also provides editable holiday templates where you can add your event details, branding, and QR Code with just a few clicks.
4. How do I ensure my Christmas event ticket design is print-ready?
Use high-quality images and set your document to the correct size and resolution (300 DPI for print).
Keep important text away from the edges to avoid trimming issues. Embed or outline your fonts before exporting.
Save the final design as a PDF to avoid formatting changes when printing.


.gif)
.webp)
.webp)