You could be an event manager, organizer, or coordinator who is planning on organizing an event soon.
You might have started making arrangements for the same already. It could be booking a venue, finalizing food and refreshments, making an event schedule, and whatnot!
Next, you want to create passes for guest entries. These passes will help you authorize guest entries and ensure no trespassing.
But here 's the thing you want to create personalized tickets for your event. Now you could do it in two different ways.
The first is by adding personalized information to each ticket. The second possible way is by personalizing the ticket design.
In fact, you may even want to do both of these together. In this article, we will discuss how you can create personalized tickets for your event easily.
A. Personalized event tickets: A quick overview
Let 's quickly discuss in detail the two different ways of personalizing your tickets:
1. Adding personalized guest information
Every event has multiple guests (sometimes even in thousands). Hence, designing a pass for them individually becomes quite a task.
As a result, most event organizers use tools to design guest passes having just event details. These passes often lack guests ' personal details such as name, seat number, row, etc.
Hence, you want a tool that rather helps you add variable guest information to each ticket. While doing that, you may also want it to still help you with the bulk generation to save time and effort.
And why not! If a tool is not saving your time or money, you shouldn't be using it.
2. Adding personalized design to each ticket
In today 's era of robust marketing tactics and competitive business offerings, branding goes a long way!
It not only makes your tickets look appealing but also increases brand recall among guests.
So you probably want to personalize your event tickets by adding design to them. To do it, you may want to add your business logo, colors, and even background image.
Well, irrespective of whichever of the two needs you have, we have a tool for you!
Ticket Generator helps you create personalized tickets within minutes. So far, it has helped reputed giants such as Emmy Awards, SIEMENS, and many educational institutes create event tickets.
Besides making your tickets personalized, it offers many other important functionalities. To learn about them, you can continue reading the next section. In case you 'd straight like to learn how to create tickets, you can jump to section C.
B. Features that empower your event tickets
While tickets created via Ticket Generator have many benefits, we 'll discuss three of them here:
1. Strengthened event security
Security measures are important for every event. They make sure your event has no unauthorized entry to safeguard your guests. And no trespassing also means better revenue without any loss of business.
Wondering how can tickets ensure that? Well, by alerting you in case any uninvited guest tries to enter the event.
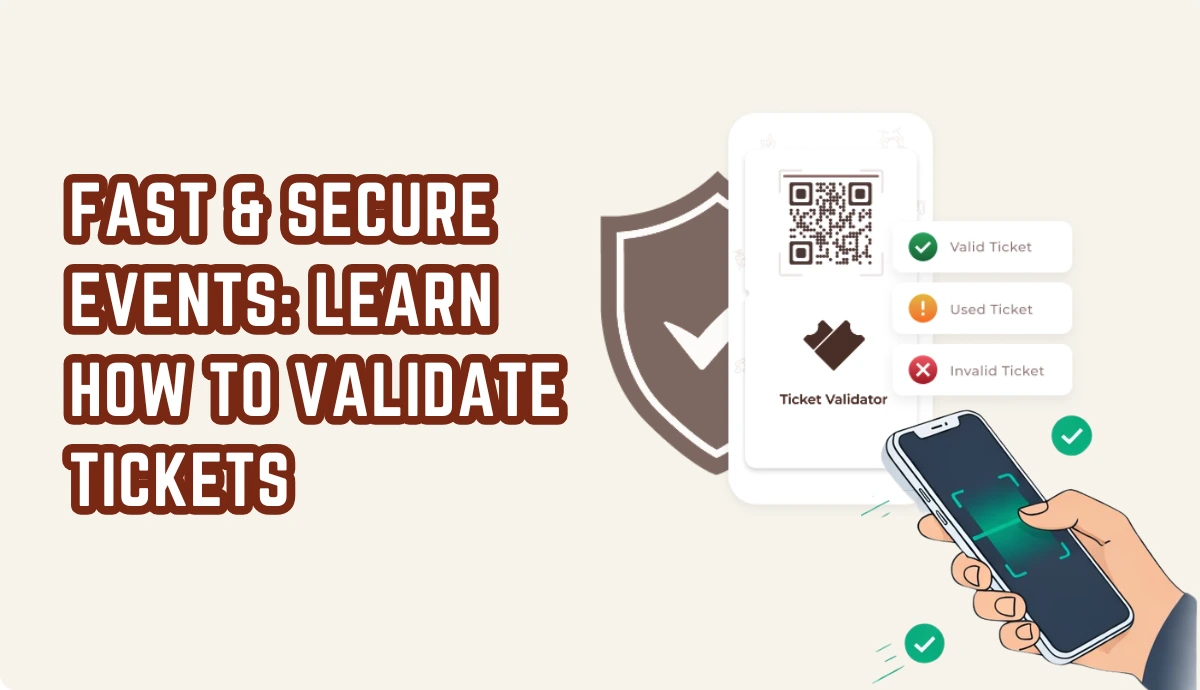
Every ticket created via Ticket Generator comes with a QR Code having a unique ID. Scanning this QR Code helps you verify if the entry is genuine or not. After scanning it, the event coordinators see one of the following three prompts on their screen:
Valid
Invalid
Duplicate
Hence, even if someone uses photo editing tools such as Photoshop, they can still not get away. Your event coordinators shall know the guest entry status right away! Isn 't that amazing?
2. Get registrations to make appropriate arrangements
Getting registrations is an indispensable part of any event. It helps you invite guests while also getting a fair idea of the actual headcount.
Using Ticket Generator, you can design a landing page to get registrations. Here, you can add all the event-related details for your audience to see. For example, event schedule, description, images, weblinks, etc.
Besides these, you can specify the form field you 'd like people to fill while registering.
In addition, you can also choose if you 'd like the registrations to be approved manually or automatically.
Once registration is approved, a ticket will be automatically created against it and sent to the respective guest. Quite convenient, right?
3. Monitor attendee insights
After you wrap up the event, it 's always a good idea to look into the attendee analytics. It helps you understand how did the event perform and where can you make improvements in the future.
How many entries were validated by each coordinator
How many tickets were registered as valid, invalid, and duplicate
You now know also know the additional benefits of secured event tickets. Let 's move on to the next step:
C. How to create personalized event tickets
In this article, we'll be using Ticket Generator for a step-by-step guide to create personalzied tickets.
1. Go to Ticket Generator and do a quick sign-up. No credit card details shall be asked for. And once you sign-up, you 'll get the first 10 credits for free. Each credit will help you create one ticket
2. Then click on the “Create new event” option. Add event-related information such as event name, date, description, venue, and time. When finished, click Create. An event is created.
3. Once the event is created, click the newly created event on the Manage Events tab. Find and click on the “Guest Tickets” section.
4. Next, click the New Ticket drop-down button and select the Bulk Ticket option to generate tickets in bulk, or select Single Ticket to create a single ticket.
5. Next, you'll see the option to add design to your tickets. There are three different ways to do this:
The first is by clicking on the "Upload own design" option: It helps you design your personalized ticket using your own templates. You will be able to display a unique ID or QR code on your ID card. You can also add variable information.
The second step is performed using the "Edit Design" option. You can design your personalized ticket from scratch using standard themes. This allows you to add logos, theme colors, or background images to your path.
The third option is "Select from template". Here you will see a number of ready-made templates to choose from.
Once you've designed your ticket, you can click Preview to see how it will look.
Note: To add variable information, click on the '+' sign. Doing so will let you add the desired number of blocks for variable information.
6. After you've designed the ticket and also selected the number of variable blocks needed, click Done.
7. Now, you 'll see four options to choose from:
a. Generate form link: It'll help you create a registration page. As explained earlier, you can use it to create a landing page with a registration form. For every approved registration, a ticket will be automatically sent to the guest
b. Generate & Download: It helps you create the tickets and download them as printable PDFs
c. Generate & Send: It'll help you create the tickets and send them to guests via SMS, Email, and/or WhatsApp
d. Generate via API: This option comes in handy if you want to integrate ticket generation into your own information system
Depending on the option you choose, you'll also be guided to add the variable information to be added to the tickets.
8. After adding the variable information, click on Generate
Your tickets will start getting processed. Once done, you 'll be able to download them or they 'll be directly sent to the guests as per the option you chose in step 7.
D. Ticket Validation and analytics
Now that you know how to create event tickets, you 'd like to know how to validate them.
1. Log in to your Ticket Generator account. Go to the Manage Events section on the right
2. Click on the three horizontal dots icon under More
3. Select Add/Edit Coordinator
Using it you 'll be able to add the email addresses of people you 'd like to add as coordinators. Once done, they 'll receive an email invitation for the same.
4. Then they can download the Ticket Validator app from App Store or Play Store
5. After downloading the app, they can log in using the same email address they received the invitation on
6. After logging in, they 'll have to just select the event that they need to validate tickets for
7. Next, they can click on Scan QR Code to get started. Their phone 's camera will launch open
That 's it. They can then scan the QR Code on each ticket to authorize the entries.
Now if you 'd like to see the event analytics, just go back to the Manage Events section. Next, click on the event you need the data for.
On the page that loads, you 'll see the option Attendance Analytics. That 's it. You 'll have all the analytical data on your screen. You 'll also be able to export it if needed.
That 's it. That 's all you need to know about creating personalized event tickets. You can now get started and make your event safer and better!
Yashika Tangri is an amazing marketing manager who operates from Trycon Technology's Noida office. Her name signifies success and fame, and she has certainly lived up to these expectations.
At work, Yashika is a highly efficient digital marketing organizer and a source of inspiration to her colleagues with her positive demeanor and professional work ethics. Despite being a lifelong student of science, Yashika decided to pursue a career in marketing in 2018.
After work hours, Yashika enjoys creating new playlists on Spotify, and she is an avid reader who finds solace in escaping reality through the pages of mythology books


.png)